Monday, March 14, 2022

How to call REST API Using Spring Webflux WebClient set proxy with authorization while calling the external site and Generate base 64 authentication header spring boot

This post will explain us, how can we call REST API using Webclient. How to set Proxy username and password to call the external site. Step 1: Add folllowing dependency in your pom.xml
   
	 org.springframework.boot
	 spring-boot-starter-webflux
	
Step 2:
import lombok.extern.slf4j.XSlf4j;
import org.springframework.http.HttpHeaders;
import org.springframework.http.MediaType;
import org.springframework.http.ResponseEntity;
import org.springframework.http.client.reactive.ClientHttpConnector;
import org.springframework.http.client.reactive.ReactorClientHttpConnector;
import org.springframework.web.reactive.function.client.WebClient;
import reactor.netty.http.client.HttpClient;
import reactor.netty.transport.ProxyProvider;

import java.net.URI;
import java.util.Base64;
import java.util.function.Consumer;
import java.util.function.Function;
 public static void main(String[] args) {
  try {
  //Generate HttP client to set proxy details
  HttpClient httpClient = HttpClient.create()
            .proxy(proxy-> proxy.type(ProxyProvider.Proxy.HTTP)
            .host("javaguruonline.com").port(1328)
            .username("siva")
            .password(new Function() {
                        @Override
                        public String apply(String s) {
                            return "test@12!";
                        }
                    }));
  ClientHttpConnector clientHttpConnector = 
           new ReactorClientHttpConnector(httpClient);
  WebClient webClient = WebClient.builder().build();
  String plainCredentials = "username" + ":" + "password";
  String base64Credentials = new String(Base64.getEncoder()
                           .encode(plainCredentials.getBytes()));
  String authorizationHeader = "Basic " + base64Credentials;
  //input json
  String json = "{\n" +
                    "  \"user\": \"siva\"\n" +
                    "}";
            //set http headers
  Consumer httpHeaders = new Consumer() {
     @Override
     public void accept(HttpHeaders httpHeaders) {
       httpHeaders.add("Authorization", authorizationHeader);
       httpHeaders.add("Content-Type", "application/json");
       httpHeaders.add("Proxy-Authorization", authorizationHeader);
     }};
   //post call to external URL and get ResponseEntity as response like body 
   //and http status code etc..
    ResponseEntity result = webClient.mutate()
                    .clientConnector(clientHttpConnector)
                    .build()
                    .post()
                    .uri(new URI("https://localhost:8080/test/details"))
                    .bodyValue(json)
                    .accept(MediaType.APPLICATION_JSON)
                    .retrieve()
                    .toEntity(String.class)
                    .block();
            System.out.println(result);
        }
        catch(Exception ex){
        }
Hope this post will help some one, while working on the REST API calls

Thursday, March 11, 2021

How to mock ResultSet , NamedParameterJdbcTemplate , RowMapper

package com.siva.springboot.javaguruonline.repository;

import java.sql.ResultSet;
import java.util.ArrayList;
import java.util.List;

import org.junit.Assert;
import org.junit.Test;
import org.junit.runner.RunWith;
import org.mockito.InjectMocks;
import org.mockito.Mock;
import org.mockito.Mockito;
import org.mockito.invocation.InvocationOnMock;
import org.mockito.stubbing.Answer;
import org.springframework.jdbc.core.RowMapper;
import org.springframework.jdbc.core.namedparam.NamedParameterJdbcTemplate;
import org.springframework.test.context.junit4.SpringRunner;

import com.siva.springboot.javaguruonline.model.EmployeeDetails;
@RunWith(SpringRunner.class)
/**
 * 
 * @author Siva
 *
 */
//@SpringBootTest(classes = SpringbootJpaSwaggerSonarqubeApplication.class)
public class EmployeeDaoImplTest {
	
	@InjectMocks
	public EmployeeDaoImpl employeeDao;
	
	@Mock
	private NamedParameterJdbcTemplate namedParameterJdbcTemplate;
	
	@SuppressWarnings("unchecked")
	@Test
	public void testGetAllEmployeeDetails(){
		List list = new ArrayList();
		EmployeeDetails employeeDetails = new EmployeeDetails();
		employeeDetails.setEmpId(1);
		employeeDetails.setEmpName("siva");
		list.add(employeeDetails);
		Mockito.when(namedParameterJdbcTemplate.query(Mockito.anyString(),
        Mockito.any(RowMapper.class)))
	    .thenAnswer(new Answer>() {
		
	        @Override
	public List answer(InvocationOnMock invocation) 
                                          throws Throwable {
	            // Fetch the method arguments
	          Object[] args = invocation.getArguments();
	          

	            // Fetch the row mapper instance from the arguments
	          RowMapper rm = (RowMapper) args[1];

	          // Create a mock result set and setup an expectation on it
	          ResultSet rs = Mockito.mock(ResultSet.class);
	          Mockito.when(rs.getInt("emp_id")).thenReturn(employeeDetails.getEmpId());
	            
	          Mockito.when(rs.getString("emp_name")).thenReturn(employeeDetails.getEmpName());
               
	            // Invoke the row mapper
	          EmployeeDetails actual = rm.mapRow(rs, 0);
	            // Assert the result of the row mapper execution
	          Assert.assertEquals(employeeDetails.getEmpName(), actual.getEmpName());

	            // Return your created list for the template#query call
	            return list;
	        }
	    });


		 employeeDao.getEmployeeDetails();
		Assert.assertNotNull(list);
	}

}

Thursday, August 27, 2020

Getting started with Chatbot using java and response in text to speech -- Java simple chatbot and text to speech

This will explain you about , how we can write simple chatbot using java and read the bot response into speech 

 Step 1: Download sample program-ab from the below archive folder Program-ab 

 Step 2: Unzip the downloaded folder. 

 Step 3: Create java maven project using any IDE or console application

 Step 4: Copy Ab.jar (Which is there in the unzipped folder lib in step 2) add to the classpath 

 Step 5: Copy bots folder (which is available in the unzipped folder) it has all the aiml files, which bot act upon our request and give the response

 Step 6: Now we need to give bot response in speech

 Step 7: Download freetss from the given link FREETTS 

 Step 8: Unzip the downloaded folder and go to \freetts-1.2.2-bin\freetts-1.2\lib folder 

 Step 9: Run the jsapi.exe file- It will generate multiple jars

 Step 10: copy that jars and place it in the classpath of the java project 

 Step 11: Once above steps completed then, we can write simple java program as follows
package com.siva;

import java.io.File;
import java.util.Locale;
import java.util.Scanner;

import javax.speech.Central;
import javax.speech.synthesis.Synthesizer;
import javax.speech.synthesis.SynthesizerModeDesc;

import org.alicebot.ab.AB;
import org.alicebot.ab.Bot;
import org.alicebot.ab.Chat;
import org.alicebot.ab.MagicBooleans;
import org.alicebot.ab.utils.IOUtils;

public class TestChatbot {

    private static final boolean TRACE_MODE = false;
    static String botName = "super";
 
    public static void main(String[] args) {
        try {
 
            String aimlResourcesPath = getResourcesPath();
            System.out.println(aimlResourcesPath);
            MagicBooleans.trace_mode = TRACE_MODE;
            Bot bot = new Bot("super", aimlResourcesPath);
            Chat chatSession = new Chat(bot);
	        AB.ab(bot);
	        Scanner sc=new Scanner(System.in);

	        String request = "Hai";
	        do{

	        request = IOUtils.readInputTextLine();
	        String response = chatSession.multisentenceRespond(request); 


	            // Set property as Kevin Dictionary 
	            System.setProperty( 
	                "freetts.voices", 
	                "com.sun.speech.freetts.en.us"
	                    + ".cmu_us_kal.KevinVoiceDirectory"); 
	  
	            // Register Engine 
	            Central.registerEngineCentral( 
	                "com.sun.speech.freetts"
	                + ".jsapi.FreeTTSEngineCentral"); 
	  
	            // Create a Synthesizer 
	            Synthesizer synthesizer 
	                = Central.createSynthesizer( 
	                    new SynthesizerModeDesc(Locale.US)); 
	  
	            // Allocate synthesizer 
	            synthesizer.allocate(); 
	  
	            // Resume Synthesizer 
	            synthesizer.resume(); 
	  
	            // Speaks the given text 
	            // until the queue is empty. 
	            synthesizer.speakPlainText( 
	            		response, null); 
	            synthesizer.waitEngineState( 
	                Synthesizer.QUEUE_EMPTY); 
	  
	        System.out.println(response); 
	        }while(!request.equals("exit"));

 
        } catch (Exception e) {
            e.printStackTrace();
        }
    }
 
    private static String getResourcesPath() {
        File currDir = new File(".");
        String path = currDir.getAbsolutePath();
        path = path.substring(0, path.length() - 2);
        System.out.println(path);
        String resourcesPath = path + File.separator + "src" 
        + File.separator + "main" + File.separator + "resources";
        return resourcesPath;
    }
}


Step 12: Once code completed , then run the java program , type the input like Hai, hello and date, there are so many QA mentioned in imal files. and we can also write our own aiml file, for reference, you can verify under boats/aiml folder 

Step 13: output will print in console and it will read the boat response.. 

 Step 14: Out put will be like below image. 


 Thanks for viewing this post.

Friday, July 24, 2020

Angular with Spring boot Getting started with Angular and Spring boot


This post will explain , how we can integrate spring boot rest api in angular js

Step 1 : We need to install angular js

Follow the steps to mention in the angular web site Angular set up

Basic commands used in angular application
npm install -g @angular/cli

Create a new angular js application

ng new employee-crud-client


Once application created then, now we need to create components, services, model classes to integrate with spring boot

Step 2: to create component - Go to src/app folder in command prompt


ng g c employee-list

We can write our entire crud operations logic inside employee-list component or we can create different components for different operations.

Once we create component , there were 4 files created

1. employee-list.component.ts - logic related to how to form request and after getting the response from service- spring boot api, how to massage and send it to ui
2. employee-list.component.html - plain html with angular script to display/action with response or user input
3. employee-list.component.spec
4. employee-list.component.css

Step 3: Once the above files created and now we need to configure these with angular components


1. app.module.ts - will have the components, which we created
2. app-routing.module.ts- will have the path details, to which path has to call the which component
3. app.component.html - will have the router-outlet, which internally call the routing-module and which will call the app.modules.ts

Step 4: This is important step, service to be created, which calls the spring boot api

ng g s employee

employee.service file will be created

this service consists of the logic , how we can call the rest api methods, This is called from the employee-list.component.ts


Step 5: We will create model class, it should be same like our pojo class in java

ng g class employee


Step 6: Once all the steps completed, then now we need to run the angular client.


ng serve
ng serve --open If there is no errors, then page directly will open in browser http://localhost:4200


Step 7 : For spring boot api application, see my previous employee crud operations with spring boot post.


Step 8: This way we can integrate our spring boot application with angular.

Thanks for viewing this post, if you have any difficulty while integration, please comment the same.

Convert Date to Number and Number to Date in Oracle


How we can convert date to number in oracle

select to_number(to_char(add_months(sysdate,-0),'yyyymm')) from dual;

How we can convert number to date

select to_char(to_date(202007,'yyyymm'),'dd-mon-yyyy') from dual;


Sunday, March 22, 2020

Spring Boot with Swagger UI , JPA , MYSQL , Mockito, Integration Test and Sonar Qube


This post will expain you about
1. How we will integrate spring boot and swagger api
2. Spring boot with JPA and MySQL (Crud Repository and NamedJdbcTemplate)
3 Spring mockMvc test for controller
4. Integration test for Service and DAO classes
5. Usage of Mockito
6. Sonarqube Code coverage

Step 1 : create a maven project called - springboot-jpa-swagger-mysql-sonarqube in eclipse
Step 2 : provide groupId,artifactId,version,jar,name and description
Step 3: Replace below pom.xml into your local system
pom.xml will have dependencies related to spring boot,swagger,jdbc,mysql,mockito,sonarqube


 4.0.0

 com.siva.springboot.javaguruonline
 springboot-jpa-swagger-mysql-sonarqube
 0.0.1-SNAPSHOT
 jar

 springboot-jpa-swagger-mysql-sonarqube
 Demo project for Spring Boot PJA MySQL AND Sonarqube

 
  org.springframework.boot
  spring-boot-starter-parent
  2.0.5.RELEASE


  UTF-8
  UTF-8
  1.8


   org.springframework.boot
   spring-boot-starter-data-jpa
  
  
   org.springframework.boot
   spring-boot-starter-web


   org.springframework.boot
   spring-boot-starter-test
   test


   mysql
   mysql-connector-java
   runtime


   io.springfox
   springfox-swagger2
   2.8.0
  
  
   io.springfox
   springfox-swagger-ui
   2.8.0
  
  
   io.springfox
   springfox-bean-validators
   2.8.0
  
  
   javax.xml
   jaxb-api
   2.1
  
  
   org.projectlombok
   lombok
   1.18.12
   provided


   org.sonarsource.scanner.maven
   sonar-maven-plugin
   3.0.2


    org.springframework.boot
    spring-boot-maven-plugin
   
   
    org.codehaus.mojo
    sonar-maven-plugin
    3.0.2
   
   
    org.jacoco
    jacoco-maven-plugin
    0.8.0
    
     
      default-prepare-agent
      
       prepare-agent


      default-report
      prepare-package
      
       report


Step 4: Now create a Springboot application, which is the starting point to run the Application.

Step 5: create appliaction.properties under resources folder, add the db related details
## Spring DATASOURCE (DataSourceAutoConfiguration & DataSourceProperties)
spring.datasource.url = jdbc:mysql://localhost:3306/employee
spring.datasource.username = root
spring.datasource.password = root


## Hibernate Properties
# The SQL dialect makes Hibernate generate better SQL for the chosen database
spring.jpa.properties.hibernate.dialect = org.hibernate.dialect.MySQL5InnoDBDialect

# Hibernate ddl auto (create, create-drop, validate, update)
spring.jpa.hibernate.ddl-auto = update

logging.level.root = DEBUG

spring.main.banner-mode=off
spring.datasource.platform=h2


Step 5: Create a SwaggerConfig class, which will have the details , what is controller package and other details
Learn more about Swagger API swagger-ui

package com.siva.springboot.javaguruonline.config;

import org.springframework.context.annotation.Bean;
import org.springframework.context.annotation.Configuration;

import springfox.documentation.builders.ApiInfoBuilder;
import springfox.documentation.builders.PathSelectors;
import springfox.documentation.builders.RequestHandlerSelectors;
import springfox.documentation.service.ApiInfo;
import springfox.documentation.service.Contact;
import springfox.documentation.spi.DocumentationType;
import springfox.documentation.spring.web.plugins.Docket;
import springfox.documentation.swagger2.annotations.EnableSwagger2;

@Configuration
@EnableSwagger2
public class Swagger2Config {
 @Bean
 public Docket api() {
  return new Docket(DocumentationType.SWAGGER_2).select()
    .apis(RequestHandlerSelectors
      .basePackage("com.siva.springboot.javaguruonline.controller"))
    .paths(PathSelectors.regex("/.*"))
    .build().apiInfo(apiEndPointsInfo());
 }

 private ApiInfo apiEndPointsInfo() {

  return new ApiInfoBuilder().title("Spring Boot REST API")
    .description("Employee Management REST API")
    .contact(new Contact("Siva Raju", "http://www.javaguruonline.com", "siva82k@gmail.com"))
    .license("Apache 2.0")
    .licenseUrl("http://www.apache.org/licenses/LICENSE-2.0.html")
    .version("1.0.0")
    .build();
 }
}


Step 6 : This project is related to employee management system - like Employee CRUD operations

Step 7 : Write Model class called Employee and EmployeeDetails

package com.siva.springboot.javaguruonline.model;

import java.io.Serializable;

import javax.persistence.Column;
import javax.persistence.Entity;
import javax.persistence.GeneratedValue;
import javax.persistence.GenerationType;
import javax.persistence.Id;
import javax.persistence.Table;

import io.swagger.annotations.ApiModel;
import io.swagger.annotations.ApiModelProperty;
import lombok.EqualsAndHashCode;
import lombok.ToString;

@Entity
@Table(name = "employee")
@ApiModel(description="All details about the Employee. ")
@ToString
@EqualsAndHashCode
public class Employee implements Serializable{

 /**
  * 
  */
 private static final long serialVersionUID = 7407317371057056536L;

 @ApiModelProperty(notes = "The database generated employee ID")
 private int id;

 @ApiModelProperty(notes = "The employee name")
 private String name;

 @ApiModelProperty(notes = "The employee age")
 private int age;

 public Employee() {

 }

 public Employee(String name, int age) {
  this.name = name;
  this.age = age;
 }

 @Id
 @GeneratedValue(strategy = GenerationType.AUTO)
 @Column(name = "emp_id", nullable = false)
 public int getId() {
  return id;
 }

 public void setId(int id) {
  this.id = id;
 }

 @Column(name = "emp_name", nullable = false)
 public String getName() {
  return name;
 }

 public void setName(String name) {
  this.name = name;
 }
 @Column(name = "email_age", nullable = false)
 public int getAge() {
  return age;
 }

 public void setAge(int age) {
  this.age = age;
 }

}

package com.siva.springboot.javaguruonline.model;

import lombok.EqualsAndHashCode;
import lombok.ToString;

@ToString
@EqualsAndHashCode
public class EmployeeDetails {
 
 private int empId;
 public int getEmpId() {
  return empId;
 }
 public void setEmpId(int empId) {
  this.empId = empId;
 }
 public String getEmpName() {
  return empName;
 }
 public void setEmpName(String empName) {
  this.empName = empName;
 }
 private String empName;

}


Step 8: Step 8: service/serviceimpl and repository classes

In the repository class, It is extending the JpaRepository, which will get all the default methods related to that Model Object.
In the DAO class, NamedParameterJdbcTemplate , to work with native query and how to map using rowmapper

package com.siva.springboot.javaguruonline.repository;

import java.util.List;

import com.siva.springboot.javaguruonline.model.EmployeeDetails;

public interface EmployeeDao {
 
 public List getEmployeeDetails();
 

}

package com.siva.springboot.javaguruonline.repository;

import java.util.List;

import org.springframework.beans.factory.annotation.Autowired;
import org.springframework.jdbc.core.namedparam.NamedParameterJdbcTemplate;
import org.springframework.stereotype.Repository;

import com.siva.springboot.javaguruonline.mapper.EmployeeDetailsMapper;
import com.siva.springboot.javaguruonline.model.EmployeeDetails;

@Repository
public class EmployeeDaoImpl implements EmployeeDao{
 String sqlQuery="select emp_id,emp_name from employee";
 @Autowired
 private NamedParameterJdbcTemplate namedParameterJdbcTemplate;

 @Override
 public List getEmployeeDetails() {
  return namedParameterJdbcTemplate.query(sqlQuery, new EmployeeDetailsMapper());
 }

}


package com.siva.springboot.javaguruonline.mapper;

import java.sql.ResultSet;
import java.sql.SQLException;

import org.springframework.jdbc.core.RowMapper;

import com.siva.springboot.javaguruonline.model.EmployeeDetails;

public class EmployeeDetailsMapper implements RowMapper {
 @Override
 public EmployeeDetails mapRow(ResultSet resultset, int count) throws SQLException {
  EmployeeDetails employeeDetails = new EmployeeDetails();
  employeeDetails.setEmpId(resultset.getInt("emp_id"));
  employeeDetails.setEmpName(resultset.getString("emp_name"));
  return employeeDetails;
 }
 

}


package com.siva.springboot.javaguruonline.repository;

import org.springframework.data.jpa.repository.JpaRepository;
import org.springframework.stereotype.Repository;

import com.siva.springboot.javaguruonline.model.Employee;

@Repository
public interface EmployeeRepository extends JpaRepository{

}


Step 9: Write Controller class, which will have the all the crud operations
package com.siva.springboot.javaguruonline.controller;

import java.util.HashMap;
import java.util.List;
import java.util.Map;

import javax.validation.Valid;

import org.springframework.beans.factory.annotation.Autowired;
import org.springframework.http.ResponseEntity;
import org.springframework.web.bind.annotation.DeleteMapping;
import org.springframework.web.bind.annotation.GetMapping;
import org.springframework.web.bind.annotation.PathVariable;
import org.springframework.web.bind.annotation.PostMapping;
import org.springframework.web.bind.annotation.PutMapping;
import org.springframework.web.bind.annotation.RequestBody;
import org.springframework.web.bind.annotation.RequestMapping;
import org.springframework.web.bind.annotation.RestController;

import com.siva.springboot.javaguruonline.exception.ResourceNotFoundException;
import com.siva.springboot.javaguruonline.model.Employee;
import com.siva.springboot.javaguruonline.model.EmployeeDetails;
import com.siva.springboot.javaguruonline.repository.EmployeeDao;
import com.siva.springboot.javaguruonline.repository.EmployeeRepository;

import io.swagger.annotations.Api;
import io.swagger.annotations.ApiOperation;
import io.swagger.annotations.ApiParam;
import io.swagger.annotations.ApiResponse;
import io.swagger.annotations.ApiResponses;


@RestController
@RequestMapping("/api/v1")
@Api(value="Employee Management System")
public class EmployeeController {
 private static final String EMPLOYEE_NOT_FOUND_FOR_THIS_ID = "Employee not found for this id :: ";

 @Autowired
 private EmployeeRepository employeeRepository;
 
 @Autowired
 private EmployeeDao employeeDao;

 @ApiOperation(value = "View a list of available employees", response = List.class)
 @ApiResponses(value = { @ApiResponse(code = 200, message = "Successfully retrieved list"),
   @ApiResponse(code = 401, message = "You are not authorized to view the resource"),
   @ApiResponse(code = 403, message = "Accessing the resource you were trying to reach is forbidden"),
   @ApiResponse(code = 404, message = "The resource you were trying to reach is not found") })
 @GetMapping("/employees")
 public List getAllEmployees() {
  return employeeRepository.findAll();
 }
 
 @ApiOperation(value = "View a list of available employee details", response = List.class)
 @ApiResponses(value = { @ApiResponse(code = 200, message = "Successfully retrieved list"),
   @ApiResponse(code = 401, message = "You are not authorized to view the resource"),
   @ApiResponse(code = 403, message = "Accessing the resource you were trying to reach is forbidden"),
   @ApiResponse(code = 404, message = "The resource you were trying to reach is not found") })
 @GetMapping("/employeedetails")
 public List getAllEmployeeDetails() {
  return employeeDao.getEmployeeDetails();
 }

 @ApiOperation(value = "Get an employee by Id")
 @GetMapping("/employees/{id}")
 public ResponseEntity getEmployeeById(
   @ApiParam(value = "Employee id from which employee object will retrieve", required = true)
   @PathVariable(value = "id") Long employeeId)
   throws ResourceNotFoundException {
  Employee employee = employeeRepository.findById(employeeId)
    .orElseThrow(() -> new ResourceNotFoundException(EMPLOYEE_NOT_FOUND_FOR_THIS_ID + employeeId));
  return ResponseEntity.ok().body(employee);
 }

 @ApiOperation(value = "Add an employee")
 @PostMapping("/employees")
 public Employee createEmployee(
   @ApiParam(value = "Employee object store in database table", required = true)
   @Valid @RequestBody Employee employee) {
  return employeeRepository.save(employee);
 }

 @ApiOperation(value = "Update an employee")
 @PutMapping("/employees/{id}")
 public ResponseEntity updateEmployee(
   @ApiParam(value = "Employee Id to update employee object", required = true)
   @PathVariable(value = "id") Long employeeId,
   @ApiParam(value = "Update employee object", required = true)
   @Valid @RequestBody Employee employeeDetails) throws ResourceNotFoundException {
  Employee employee = employeeRepository.findById(employeeId)
    .orElseThrow(() -> new ResourceNotFoundException(EMPLOYEE_NOT_FOUND_FOR_THIS_ID + employeeId));

  employee.setName(employeeDetails.getName());
  employee.setAge(employeeDetails.getAge());
  final Employee updatedEmployee = employeeRepository.save(employee);
  return ResponseEntity.ok(updatedEmployee);
 }

 @ApiOperation(value = "Delete an employee")
 @DeleteMapping("/employees/{id}")
 public Map deleteEmployee(
   @ApiParam(value = "Employee Id from which employee object will delete from database table", required = true)
   @PathVariable(value = "id") Long employeeId)
   throws ResourceNotFoundException {
  Employee employee = employeeRepository.findById(employeeId)
    .orElseThrow(() -> new ResourceNotFoundException(EMPLOYEE_NOT_FOUND_FOR_THIS_ID + employeeId));

  employeeRepository.delete(employee);
  Map response = new HashMap<>();
  response.put("deleted", Boolean.TRUE);
  return response;
 }
}


Step 10: Once above code has been completed, then you can run the application by right clicking on the Springboot application.
Step 11. Once the application executed successfully, then we need to test this application

One way is either Using- SOAP UI, Postman - these needs to be installed on our machine, else we can't test the rest service.
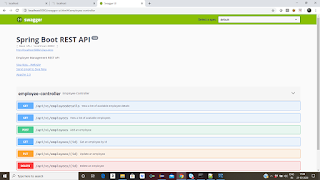
To test the REST API, we already configured Swagger UI. So just go to your web browser, then click, http://localhost:8080/swagger-ui.html - it will display all the operations, which is availabe in controller class.


Now you can test those API's by giving request parameters


Step 12: Once done, we need to write Junit test cases for the all the classes

package com.siva.springboot.javaguruonline;

import org.junit.Test;
import org.junit.runner.RunWith;
import org.springframework.boot.test.context.SpringBootTest;
import org.springframework.test.context.junit4.SpringRunner;

@RunWith(SpringRunner.class)
@SpringBootTest
public class SpringbootJpaSwaggerSonarqubeApplicationTest {

 @Test
 public void contextLoads() {
 }

}


Controller class test

package com.siva.springboot.javaguruonline.controller;

import static org.hamcrest.Matchers.hasSize;
import static org.springframework.test.web.servlet.request.MockMvcRequestBuilders.get;
import static org.springframework.test.web.servlet.result.MockMvcResultMatchers.content;
import static org.springframework.test.web.servlet.result.MockMvcResultMatchers.jsonPath;
import static org.springframework.test.web.servlet.result.MockMvcResultMatchers.status;

import java.io.File;
import java.io.FileWriter;
import java.util.ArrayList;
import java.util.List;

import javax.annotation.meta.When;

import org.junit.Test;
import org.junit.runner.RunWith;
import org.mockito.Mock;
import org.springframework.beans.factory.annotation.Autowired;
import org.springframework.boot.test.autoconfigure.web.servlet.AutoConfigureMockMvc;
import org.springframework.boot.test.context.SpringBootTest;
import org.springframework.http.MediaType;
import org.springframework.test.context.junit4.SpringJUnit4ClassRunner;
import org.springframework.test.web.servlet.MockMvc;

import com.fasterxml.jackson.databind.ObjectMapper;
import com.siva.springboot.javaguruonline.SpringbootJpaSwaggerSonarqubeApplication;
import com.siva.springboot.javaguruonline.model.Employee;
import com.siva.springboot.javaguruonline.model.EmployeeDetails;
import com.siva.springboot.javaguruonline.repository.EmployeeDaoImpl;
import com.siva.springboot.javaguruonline.repository.EmployeeRepository;
import static org.mockito.Mockito.mock;
import static org.mockito.Mockito.when;

@RunWith(SpringJUnit4ClassRunner.class)
@SpringBootTest(webEnvironment = SpringBootTest.WebEnvironment.RANDOM_PORT,classes=SpringbootJpaSwaggerSonarqubeApplication.class)
@AutoConfigureMockMvc
public class EmployeeControllerTest {
 @Autowired
 private MockMvc mockMvc;
 
 @Autowired
 private EmployeeRepository employeeRepository;
 @Mock
 private EmployeeDaoImpl employeeDao;
 
 
 @Test
 public void testGetAllEmployees() throws Exception{
  List employeeList  = employeeRepository.findAll();
  ObjectMapper mapper = new ObjectMapper();
  String jsonString = mapper.writeValueAsString(employeeList);
  FileWriter file = new FileWriter(new File("employee.json"));
  file.write(jsonString);
  file.close();
  this.mockMvc.perform(get("/api/v1/employees")).andExpect(status().isOk()).andExpect(content().contentType(MediaType.APPLICATION_JSON_UTF8))
  .andExpect(jsonPath("$", hasSize(4)));

 } 
 
 @Test
 public void testGetAllEmployeeDetails()  throws Exception {
  EmployeeDetails employee = new EmployeeDetails();
  employee.setEmpId(123);
  employee.setEmpName("Siva");
  List employeeList = new ArrayList();
  employeeList.add(employee);
  when(employeeDao.getEmployeeDetails()).thenReturn(employeeList);
  this.mockMvc.perform(get("/api/v1/employeedetails")).andExpect(status().isOk()).andExpect(content().contentType(MediaType.APPLICATION_JSON_UTF8))
  .andExpect(jsonPath("$", hasSize(4)));
  
 }

}


DaoImpl Test

package com.siva.springboot.javaguruonline.repository;

import java.util.List;

import org.junit.Assert;
import org.junit.Test;
import org.junit.runner.RunWith;
import org.springframework.beans.factory.annotation.Autowired;
import org.springframework.boot.test.context.SpringBootTest;
import org.springframework.test.context.junit4.SpringRunner;

import com.siva.springboot.javaguruonline.SpringbootJpaSwaggerSonarqubeApplication;
import com.siva.springboot.javaguruonline.model.EmployeeDetails;
import com.siva.springboot.javaguruonline.repository.EmployeeDao;
@RunWith(SpringRunner.class)
@SpringBootTest(classes = SpringbootJpaSwaggerSonarqubeApplication.class)
public class EmployeeDaoImplTest {
 
 @Autowired
 public EmployeeDao employeeDao;
 
 @Test
 public void testGetAllEmployeeDetails(){
  List employeeDetails = employeeDao.getEmployeeDetails();
  Assert.assertNotNull(employeeDetails);
 }

}


Repository Test

package com.siva.springboot.javaguruonline.repository;

import java.util.List;

import org.junit.Assert;
import org.junit.Test;
import org.junit.runner.RunWith;
import org.springframework.beans.factory.annotation.Autowired;
import org.springframework.boot.test.context.SpringBootTest;
import org.springframework.test.context.junit4.SpringRunner;

import com.siva.springboot.javaguruonline.SpringbootJpaSwaggerSonarqubeApplication;
import com.siva.springboot.javaguruonline.model.Employee;
import com.siva.springboot.javaguruonline.repository.EmployeeRepository;

@RunWith(SpringRunner.class)
@SpringBootTest(classes = SpringbootJpaSwaggerSonarqubeApplication.class)
public class EmployeeRepositoryTest {
 @Autowired
 EmployeeRepository employeeRepository;
 
 @Test
 public void getEmployeeDetails(){
  List employeeList = employeeRepository.findAll();
  Assert.assertNotNull("EmployeeListNotEmpty", employeeList);;
 }
 

}


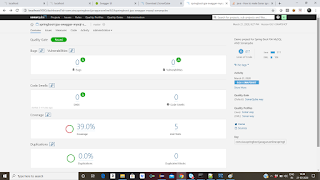
Step 13: We need to check the code coverage tool called Sonarqube, required dependencies added in pom.xml

Step 14: Download Sonarqube from SonarQube - and look for Historical Downloads, then download , which ever the version you want to work on.


Step 15 : Unzip that file and go to bin folder- StartSonar.bat file

Step 16 : Once Sonar is up, then go to browser and try http://localhost:9000 , login with username -admin and password- admin

Step 17: Once Sonarqube is up and running, we need to run the code through either sonar scanner or maven

Before Scanning the code, we need to create properties file called - sonar-project.properties place the inside of the your project
and need to mention src code path , test path, java version.. etc

# must be unique in a given SonarQube instance
sonar.projectKey=springboot-jpa-swagger-mysql-sonarqube
# this is the name displayed in the SonarQube UI
sonar.projectName=springboot-jpa-swagger-mysql-sonarqube
sonar.projectVersion=1.0


# Path is relative to the sonar-project.properties file. Replace "\" by "/" on Windows.
# Since SonarQube 4.2, this property is optional if sonar.modules is set. 
# If not set, SonarQube starts looking for source code from the directory containing 
# the sonar-project.properties file.
sonar.sources=/src/main/java/
 
# Encoding of the source code. Default is default system encoding
sonar.sourceEncoding=UTF-8

sonar.junit.reportPaths=./target/surefire-reports
# Generate sonar issues report in html and console
sonar.issuesReport.html.enable=true
sonar.issuesReport.console.enable=true

# Display Jacoco report into SonarQube dashboard
# Comma-separated paths to directories with tests (optional)
sonar.tests=/src/test/java/
# This name depends on the configuration in pom.xml. In this example we have ${project.build.directory}/coverage-reports/jacoco-ut.exec entry in our pom.xml
sonar.jacoco.reportPath=target/surefire-reports/jacoco-ut.exec
sonar.dynamicAnalysis=reuseReports
sonar.java.coveragePlugin=jacoco
sonar.jacoco.reportMissing.force.zero=true
sonar.java.binaries=/target/classes/
sonar.coverage.exclusions=**/*Employee.java,**/*EmployeeDetails.java,**/*ErrorDetails.java,**/*ErrorDetails.java,**/*ResourceNotFoundException.java

Step 18 : Use the below command to run the code coverage- make sure before running the sonar, sonarqube should up and running
Go to your project location in the command prompt.
/>mvn clean install sonar:sonar


Saturday, February 29, 2020

Getting Started with Apache Solr on Windows


This Post will explain about what is Apache Solr and how to do the setup on windows environment, Basic Apache Solr commands

What is Apache Solr?

Solr is the popular, blazing-fast, open source enterprise search platform built on Apache Lucene

Solr is highly reliable, scalable and fault tolerant, providing distributed indexing, replication and load-balanced querying, automated failover and recovery, centralized configuration and more. Solr powers the search and navigation features of many of the world's largest internet sites

We need the Java Runtime Environment (JRE) version 1.8 or higher to install the Apache Solr

Check the java version using the below command

Java -version

Step 1:

Download the Apache latest version from this link, either source or binary
Download Apache Solr

Apache solr-8.4.1.zip


Step 2:

Unzip the downloaded one and set the path, inside environment variables, check my previous post how to set the environment variables

After Setting the env varibles, use the below command to start the solr


Step 3:

Go to the location, where it has unzipped up to bin folder

solr start

Will start the solr and give the message stating solr has been started

Know the status of the solr use the below command

solr status

create a core that uses a data-driven schema which tries to guess the correct field type when you add documents to the index.

solr create -c movies

Step 4:

Use the below link in the browser, to check about created core and other details

try with http://localhost:8983/


Step 5:

Stop the Solr

solr stop -all

Thank you for viewing this post , just we created the core, Next post will explain , how to do the indexing and search and many more features, which is provided by Apache Solr.

Sunday, February 23, 2020

How Apache Kafka is Better than any other traditional messaging brokers(Active MQ,JMS,Camel,IBM MQ)


1. Kafka is a distributed streaming platform
2. Kafka stores all the messages before sending or after successufully received by subscriping applications.
3. Kafka Run as a cluster on one or more servers that can be available on multiple datacenters.
4. Kafka is client centric and it has fair distribution of related messages to consumers and it is extreamly fast and scalable broker
5. Kafka has Horizontally scalable, by adding more partitions
6. Kafka does not degrade performance , adding of new consumers
7. Kafaka uses one destination type called topic, which internally combines both publish-subscribe and point-to-point
8. Kafka message is key-value pair. payload of the message sent as the value.
9. Kafaka cients are responsible for replaying failed messages
10. Kafka retains messages, it is possible for clients to retrieve any message, providing option for re-processing of all messages.

Traditional messasing brokers either don't persist messages at all. and it will store only until they consumed and acknowledged.
Traditional messaging brokers like imperative programming, An event is occurred and our code is notified of that event. it is tightly coupled.

You can Read Apache Kafka for more information about apache kafka


Monday, October 28, 2019

Jasper Reports export to EXCEL, CSV and PDF Using JRXML Java and My SQL


This Post will explain , How to export different formats using Jasper and Jrxml using java

Step 1: Download Download Jasper Studio
or I Report Designer


Step 2 : Design your page by providing connection details and query details and what columns needs to be display in PDF/excel/CSV


Step 3: Your design Page details can be mentioned in Summary Band.


Step 4: Once design completes , then it is time to write java class to export into different formats


Step 5: Excel report Generation


package arrayListTest;

import java.io.File;
import java.sql.Connection;
import java.sql.DriverManager;
import java.util.HashMap;

import net.sf.jasperreports.engine.JasperCompileManager;
import net.sf.jasperreports.engine.JasperFillManager;
import net.sf.jasperreports.engine.JasperPrint;
import net.sf.jasperreports.engine.JasperReport;
import net.sf.jasperreports.engine.export.JRCsvExporter;
import net.sf.jasperreports.engine.export.JRPdfExporter;
import net.sf.jasperreports.engine.export.JRXlsExporter;
import net.sf.jasperreports.export.SimpleCsvExporterConfiguration;
import net.sf.jasperreports.export.SimpleExporterInput;
import net.sf.jasperreports.export.SimpleOutputStreamExporterOutput;
import net.sf.jasperreports.export.SimplePdfExporterConfiguration;
import net.sf.jasperreports.export.SimpleWriterExporterOutput;
import net.sf.jasperreports.export.SimpleXlsReportConfiguration;

public class GenerateMultipleReportsFromJasper {
 
  public static void main(String[] args) {

  //Jrxml file source
  String sourceFileName = "C:\\Users\\Siva\\JaspersoftWorkspace\\csvpdf\\csv_export.jrxml";
  //destination file location
  String outXlsName = "C:\\Users\\Siva\\JaspersoftWorkspace\\csvpdf\\test.xls";
  //If we want to pass any parameters to jasper report, then we can use this map
  HashMap xlsParams = new HashMap();
  Connection con = null;
  try {
    Class.forName("com.mysql.jdbc.Driver");
    // here employee is database name, root is username and password
    con = DriverManager.getConnection("jdbc:mysql://localhost:3306/employee", "root", "root");
    JasperReport report = JasperCompileManager.compileReport(sourceFileName );
    JasperPrint xlsPrint = JasperFillManager.fillReport(report, xlsParams, con);
    JRXlsExporter xlsExporter = new JRXlsExporter();
    xlsExporter.setExporterInput(new SimpleExporterInput(xlsPrint));
    xlsExporter.setExporterOutput(new SimpleOutputStreamExporterOutput(outXlsName));
    SimpleXlsReportConfiguration xlsReportConfiguration = new SimpleXlsReportConfiguration();
    xlsReportConfiguration.setOnePagePerSheet(false);
    xlsReportConfiguration.setRemoveEmptySpaceBetweenRows(true);
    xlsReportConfiguration.setDetectCellType(false);
    xlsReportConfiguration.setWhitePageBackground(false);
    xlsExporter.setConfiguration(xlsReportConfiguration);
    xlsExporter.exportReport();
  } catch (Exception e) {
      System.out.println(e);
    }
    finally{
      try{
 if(con != null){
    con.close();
 }
 
      }
    catch(Exception ex){
 }
    }
  }

}


Step 6: CSV Generation


HashMap csvParamsMap = new HashMap();
String outcsvName = "C:\\Users\\Siva\\JaspersoftWorkspace\\csvpdf\\test.csv";
JasperReport report1 = JasperCompileManager.compileReport(sourceFileName );
JasperPrint jasperPrint = JasperFillManager.fillReport(report1, csvParamsMap, con);
JRCsvExporter exporter = new JRCsvExporter();
exporter.setExporterInput(new SimpleExporterInput(jasperPrint));
exporter.setExporterOutput(new SimpleWriterExporterOutput(new File(outcsvName)));
SimpleCsvExporterConfiguration configuration = new SimpleCsvExporterConfiguration();
configuration.setWriteBOM(Boolean.TRUE);
configuration.setRecordDelimiter("\r\n");
exporter.setConfiguration(configuration);
exporter.exportReport();


Step 7: PDF Generation


HashMap pdfParamsMap = new HashMap();
String outPdfName = "C:\\Users\\Siva\\JaspersoftWorkspace\\csvpdf\\test.pdf";
JasperReport report2 = JasperCompileManager.compileReport(sourceFileName );
JasperPrint jasperPrint2 = JasperFillManager.fillReport(report2, pdfParamsMap, con);
JRPdfExporter pdfExporter = new JRPdfExporter();
pdfExporter.setExporterInput(new SimpleExporterInput(jasperPrint2));
pdfExporter.setExporterOutput(new SimpleOutputStreamExporterOutput(outPdfName));
SimplePdfExporterConfiguration pdfConfiguration = new SimplePdfExporterConfiguration();
pdfConfiguration.setCreatingBatchModeBookmarks(true);
pdfExporter.setConfiguration(pdfConfiguration);


Step 8: Required jar file to execute this program


1. Itext 2.1.7.jar
2. commons-beanutils-1.9.2.jar
3. commons-logging-1.2.jar
4. commons-collections-3.2.1.jar
5. commons-lang-2.6.jar
6. commons-digester-1.6.jar
7. jasperreports-6.2.0.jar
8. mysql-connector-java-5.1.40.jar
9. poi-ooxml-3.16.jar
10. poi-3.12.jar


Step 9: Once We downloaded all jars then add into java build path.

Step 10: This is how we can export different format using jasper jrxml and Java.


Saturday, August 10, 2019

Getting started with Kubernetes and Install Kubernetes on Windows , Tools for Kubernetes Cluster


1. What is Kubernetes?
It is an open source system for automating deployment, scaling and managing containerized applications

How to install Kubernetes?

1. Install Kube control(kubectl) on Windows
2. kubectl (kubernet command control tool) , used to run the commands in kubernetes clusters.
3. Before install, we have to make sure each client version has to work with minor difference with master
For example, a v1.2 client should work with v1.1, v1.2, and v1.3 master

4. Download from the given link Download Kubernetes
5. Add the binary in to your PATH.(System - Environment Variables)
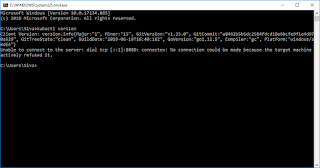
6.Check the version using kubectl version

We can create sample cluster online using following link

Online interactive kubernetes cluster

Popular tools for kubernetes clusters
1. (Mini Kube)
2. Google Kubernetes Engine (GKE)
3. Amazon Elastic Kubernetes Service (EKS):
4. Azure Kubernetes Service (AKS)

Wednesday, August 8, 2018

Getting started Machine Learning Using R on Windows environment Step By Step Process.


This post will explain us, how to install R on windows environment and how to work with Machine learning project using R with simple dataset

First Download R https://cran.r-project.org/bin/windows/base/ from this link.
You can download latest version of R.
1. Once download completes, then install the same in your machine. This is like any other software installation. There is no special instructions required for this.
2. After successful installation we need to setup the path- go to MyComputer-RightClick- environment variables- System variables-
C:\Program Files\R\R-3.5.1\bin


3. After setting up the path, Now we need to start the R
4. Go to command prompt and Type R
5. Now we can see the simple R terminal


6. Now we will understand what is machine learning? and what is datasets?
7. When we are applying machine learning to our own datasets, we are working on a project.
The process of a machine learning project may not be linear, but there are a number of well-known steps:

Define Problem.
Prepare Data.
Evaluate Algorithms.
Improve Results.
Present Results.

8.The best way to really come in terms with a new platform or tool is to work through a machine learning project end-to-end and cover the key steps.
Namely, from loading data, summarizing your data, evaluating algorithms and making some predictions.
Machine Learning using R Step By Step
Now this the time to work simple machine learning program using R and inbuilt dataset called iris

We already installed R and it has started.
Install any default packages using following syntax.


Packages are third party add-ons or libraries that we can use in R.

install.packages("caret")
//While installing the package, after typing the above command , it will ask us for select mirror, you can select default one.
  install.packages(“caret”,dependencies=c(“Depends”,”Suggests”))
  install.packages(“ellipse”)
//Load the package, which we are going to use.
libray(caret)
Load the data from inbuilt data and rename the same using following syntax.
// Attach iris dataset to the current environment
  data(iris)
// Rename iris dataset  to dataset
 dataset <- iris
Now iris data loaded in R and accessible with variable called dataset Now we will create validation dataset. We will split the loaded dataset into two, 80% of which we will use to train our models and 20% that we will hold back as a validation dataset.
//  We create a list of 80% of the rows in the original dataset we can use for training
validation_index <- createDataPartition(dataset$Species, p=0.80, list=FALSE)
//select 20% of the data for validation
validation <- dataset[-validation_index,]
//use the remaining 80% of data to training and testing the models
dataset <- dataset[validation_index,]

          
Now we have training data in the dataset variable and a validation set we will use later in the validation variable. Note that we replaced our dataset variable with the 80% sample of the dataset. 1. dim function We can get a quick idea of how many instances (rows) and how many attributes (columns) the data contains with the dim function.
dim(dataset)
2. Attribute types - Knowing the types is important as it will give us an idea of how to better summarize the data we have and the types of transforms we might need to use to prepare the data before we model it.
sapply(dataset,class)
3. head function used to display the first five rows.
head(dataset)
4. The class variable is a factor. A factor is a class that has multiple class labels or levels
levels(dataset$Species)
5. Class Distribution Let’s now take a look at the number of instances (rows) that belong to each class. We can view this as an absolute count and as a percentage. 6. Summary of each Attribute
    summary(dataset)
Visualize Dataset We now have a seen the basic details about the data. We need to extend that with some visualizations. We are going to look at two types of plots: 1. Univariate plots to better understand each attribute. 2. Multivariate plots to better understand the relationships between attributes. First we will see the Univariate plots, this is for each individual variable. Input attributes x and the output attributes y.
  //Split input and output
    x <- dataset[,1:4]
    y <- dataset[,5]
Given that the input variables are numeric, we can create box and whisker plots of each.
   par(mfrow=c(1,4))
   for(i in 1:4) {
   boxplot(x[,i], main=names(iris)[i])
 }
 
We can also create a barplot of the Species class variable to get a graphical representation of the class distribution (generally uninteresting in this case because they’re even).
plot(y)
This confirms what we learned in the last section, that the instances are evenly distributed across the three class: Multivariate Plots First let’s look at scatterplots of all pairs of attributes and color the points by class. In addition, because the scatterplots show that points for each class are generally separate, we can draw ellipses around them.
featurePlot(x=x,y=y,plot=”ellipse”)
We can also look at box and whisker plots of each input variable again, but this time broken down into separate plots for each class. This can help to tease out obvious linear separations between the classes.
featurePlot(x=x,y=y,plot=”box”)
Next we can get an idea of the distribution of each attribute, again like the box and whisker plots, broken down by class value. Sometimes histograms are good for this, but in this case we will use some probability density plots to give nice smooth lines for each distribution.
// density plots for each attribute by class value
scales <- list(x=list(relation="free"), y=list(relation="free"))
featurePlot(x=x, y=y, plot="density", scales=scales)
Evaluating the Algorithms Set-up the test harness to use 10-fold cross validation. We will split our dataset into 10 parts, train in 9 and test on 1 and release for all combinations of train –test splits. We will also repeat the process 3 times for each algorithm with different splits of the data into 10 groups We are using the metric of “Accuracy” to evaluate models. This is a ratio of the number of correctly predicted instances in divided by the total number of instances in the dataset multiplied by 100 to give a percentage (e.g. 95% accurate). We will be using the metric variable when we run build and evaluate each model next.
control <- tarinControl(method=”csv”,number=10)
     metric <- “Accuarcy”
Build 5 different models to predict species from flower measurements Linear Discriminant Analysis (LDA) Classification and Regression Trees (CART). k-Nearest Neighbors (kNN). Support Vector Machines (SVM) with a linear kernel. Random Forest (RF)
set.seed(7)
fit.lda <- train(Species~., data=dataset, method="lda", metric=metric, trControl=control)
# b) nonlinear algorithms
# CART
set.seed(7)
fit.cart <- train(Species~., data=dataset, method="rpart", metric=metric, trControl=control)
# kNN
set.seed(7)
fit.knn <- train(Species~., data=dataset, method="knn", metric=metric, trControl=control)
# c) advanced algorithms
# SVM
set.seed(7)
fit.svm <- train(Species~., data=dataset, method="svmRadial", metric=metric, trControl=control)
# Random Forest
set.seed(7)
fit.rf <- train(Species~., data=dataset, method="rf", metric=metric, trControl=control)


We reset the random number seed before reach run to ensure that the evaluation of each algorithm is performed using exactly the same data splits. It ensures the results are directly comparable. Select the best model. We now have 5 models and accuracy estimations for each. We need to compare the models to each other and select the most accurate. We can report on the accuracy of each model by first creating a list of the created models and using the summary function.
# summarize accuracy of models
results <- resamples(list(lda=fit.lda, cart=fit.cart, knn=fit.knn, svm=fit.svm, rf=fit.rf))
summary(results)

We can also create a plot of the model evaluation results and compare the spread and the mean accuracy of each model. There is a population of accuracy measures for each algorithm because each algorithm was evaluated 10 times (10 fold cross validation)
dotplot(results)
The results can be summarized. This gives a nice summary of what was used to train the model and the mean and standard deviation (SD) accuracy achieved, specifically 97.5% accuracy +/- 4% How to Predictions using predict and confusion Matrix The LDA was the most accurate model. Now we want to get an idea of the accuracy of the model on our validation set. This will give us an independent final check on the accuracy of the best model. It is valuable to keep a validation set just in case you made a slip during such as overfitting to the training set or a data leak. Both will result in an overly optimistic result. We can run the LDA model directly on the validation set and summarize the results in a confusion matrix.
predictions <- predict(fit.lda,validation)
    confusionMatrix(predictions,validation$Species)
   

Thursday, August 2, 2018

REST, REST Security, REST API Methods, REST annotations


REST - Representational State Transfer

1. REST is Architecture Style implementation

2. REST implemenation is based on Json Over HTTP

3. REST implemented based on simple HTTP protocol

4. REST has better scalability and performance

5. REST permits more data formats like JSON,XML etc..

6. REST emphasizes scalability of component interactions, independent deployments of components.

7. REST is design of HTTP and URI standards

8. REST is follow http methods like GET,POST,PUT,DELETE,PATCH

9. HTTP PATCH requests are to make partial update on a resource.
PUT requests also modify a resource entity so to make more clear –
PATCH method is the correct choice for partially updating an existing resource
and PUT should only be used if we are replacing a resource in it’s entirety.

10. REST impelnetations using JAX-RS and Jersy

11. Annotations of JAX-RS

@Context

Injects information into a class field, bean property, or method parameter

@CookieParam

Extracts information from cookies declared in the cookie request header

@FormParam

Extracts information from a request representation whose content type is application/x-www-form-urlencoded

@HeaderParam

Extracts the value of a header

@MatrixParam

Extracts the value of a URI matrix parameter

@PathParam

Extracts the value of a URI template parameter

@QueryParam

Extracts the value of a URI query parameter

12. HTTP Status codes

200 OK - Response to a successful REST API action. The HTTP method can be GET, POST, PUT, PATCH or DELETE.
400 Bad Request - The request is malformed, such as message body format error.
401 Unauthorized - Wrong or no authentication ID/password provided.
403 Forbidden - It's used when the authentication succeeded but authenticated user doesn't have permission to the request resource.
404 Not Found - When a non-existent resource is requested.
405 Method Not Allowed - The error checking for unexpected HTTP method. For example, the RestAPI is expecting HTTP GET, but HTTP PUT is used.


13. REST security

javax.ws.rs.core.SecurityContext interface to implement security programmatically


   GET
        @Produces("text/plain;charset=UTF-8")
        @Path("/hello")
        public String updateUser(@Context SecurityContext sc) {
                if (sc.isUserInRole("admin"))  return "User will be updated";
                throw new SecurityException("User is unauthorized.");
        }

Applying annotations to your JAX-RS classes

DeclareRoles

Declares roles.

DenyAll

Specifies that no security roles are allowed to invoke the specified methods.

PermitAll

Specifies that all security roles are allowed to invoke the specified methods.

RolesAllowed

Specifies the list of security roles that are allowed to invoke the methods in the application.

RunAs

Defines the identity of the application during execution in a J2EE container.


@Path("/helloUser")
@RolesAllowed({"ADMIN", "DEV"})
public class helloUser {

   @GET
   @Path("updateUser")  
   @Produces("text/plain")
   @RolesAllows("ADMIN")
   public String updateUser() {
      return "User Updated!";
   }
}

Updating the web.xml deployment descriptor to define security configuration


             Users
             /user
             GET
             POST
         
         
             admin 


            BASIC
            default
        
    
        admin


Thanks for viewing this post. If you like it don't forget to provide comments


Sunday, July 15, 2018

Given Strings are anagrams or not using java


What is String Anagram?

"An anagram is a type of word, the result of rearranging the letters of a word or phrase to produce a new word or phrase, using all the original letters exactly once.

for Example: 'java' can be rearranged as - 'vaaj' or 'vjaa' -all characters are equal in both the words. So this is called string anagram.

Now we will see how to write a java program to check whether given strings are anagram or not.


package com.siva;

import java.util.Arrays;

public class StringAnagramTest {
 
 
  public boolean isStringAnagram(String s1, String s2){
   char[] charArray1 = s1.toCharArray();
   char[] charArray2 = s2.toCharArray();
   Arrays.sort(charArray1);
   Arrays.sort(charArray2);
   boolean stringAnagram = Arrays.equals(charArray1, charArray2);
   return stringAnagram;
  }
  
  public static void main(String[] args) {
   StringAnagramTest test = new StringAnagramTest();
    String str1 ="test";
    String str2 ="sett";
  boolean stringAnagram = test.isStringAnagram(str1, str2);
   if(stringAnagram){
    System.out.println("Given Strings["+str1+"] and ["+str2 +"] are anagrams");
   }else{
    System.out.println("Given Strings["+str1+"] and ["+str2 +"] are not anagrams");
   }
}

}


We can provide any value as input for both the strings.

Detailed Explanation:

Step 1: Convert given Strings into character array.

Step 2: Sort the converted character array using Arrays.sort

Step 3: compare both the strings using Arrays.equals

There are different ways to implement the same logic by writing our own sorting and equals methods. this is simple way to find the result.

output:


Given Strings[test] and [sett] are anagrams


Thursday, March 1, 2018

Java Program to check whether given word is Palindrome or not


This post will explain us, how to implement palindrome logic with different ways, using java.

public class WordPalindrome {
  public static void main(String[] args) {
   String word="LIRIL";
   boolean isPalin = isPalindromeOne(word);
   if(isPalin){
    System.out.println("Given word ["+word+"] is palindrome");
   }else{
    System.out.println("Given word ["+word+"] is not palindrome");
   }
   word = "Hello";
   isPalin = isPalindromeOne(word);
   if(isPalin){
    System.out.println("Given word ["+word+"] is palindrome");
   }else{
    System.out.println("Given word ["+word+"] is not palindrome");
   }
   
  }


  public static boolean isPalindromeOne(String word){
   boolean isPalindrome = false;
   //first way of checking
   char[] array = word.toCharArray();
   char[] newArray = new char[array.length];
   for (int i = 0; i < array.length; i++) {
  char c = array[array.length-i-1];
  newArray[i] =(char)c;
 }
   if(word.equalsIgnoreCase(String.valueOf(newArray))){
    isPalindrome = true;
   }
   //second way of checking
   String reverse ="";
   for (int i = 0; i < word.length(); i++) {
  char c= word.charAt(i);
  reverse = c+reverse;
 }
   if(reverse.equalsIgnoreCase(word)){
    isPalindrome = true; 
   }


   return isPalindrome;
  }


}


Saturday, February 10, 2018

Jersy Rest Webervice with eclipse and Weblogic 12c or tomcat


How to work with jersy rest webservice using eclipse and weblogic server/tomcat

Step 1: Create a dynamic web project in eclipse and provide project name


Step 2: open web.xml and add below configuration code for rest webservices.


  jersyRestService
  
    index.html
    index.htm
    index.jsp
    default.html
    default.htm
    default.jsp
  
      
        Jersey Web Application
        com.sun.jersey.spi.container.servlet.ServletContainer
    
    
        Jersey Web Application
        /rest/*


Step 3: Create one file name called weblogic.xml and add the below code.


12.2
    
        jax-rs
        2.0
        2.22.1.0
        false


Step 4: Download rest api related jar -http://repo1.maven.org/maven2/com/sun/jersey/jersey-archive/1.19.1/jersey-archive-1.19.1.zip Unzip the same and place the jar inside lib folder of the project.


Step 5: Create a class name called RestServiceAPI.java add below code.

package com.siva.restservice;

import javax.ws.rs.GET;
import javax.ws.rs.Path;
import javax.ws.rs.PathParam;
import javax.ws.rs.Produces;
import javax.ws.rs.core.MediaType;
/**
 * 
 * @author Siva
 *
 */

@Path("/helloRest")
public class SimpleRestService {
	
	
	@GET
	@Produces(MediaType.TEXT_PLAIN)
	public String getDetails(){
		System.out.println("This is Get request");
		return "Hello Welcome to Rest webservice";
	}
	@GET
	@Path("/getDetail/{requestParam}")
	@Produces(MediaType.TEXT_PLAIN)
	public String getDetailsWithParameter(@PathParam("requestParam") String requestParam){
		System.out.println("USer request paramater["+requestParam +"]");
		System.out.println("This is Get request");
		return "Hello Welcome to Rest webservice you have given input as -"+requestParam;
	}

}


Step 6: Create one config class called- ApplicationConfig.java
Right click on src-> Webservice->RestWebservice->select Classname- which class needs to be configured in ApplicationConfig Click Next-> Finish

package rest.application.config;

import java.util.HashSet;
import java.util.Set;

import javax.ws.rs.ApplicationPath;
import javax.ws.rs.core.Application;
/**
 * 
 * @author Siva
 *
 */
@ApplicationPath("resources")
public class ApplicationConfig  extends Application{

	public Set> getClasses(){
		return getRestClasses();
	}
	
	private Set> getRestClasses(){
	  Set> resources = new HashSet>();	
	  resources.add(com.siva.restservice.SimpleRestService.class);
	  return resources;
	}
	
}


Step 7: This is very important step

Run the weblogic server and open the console
http://localhost:7001/console provide username and password and login the same into weblogic server admin console

Step 8: Click on the Deployments- the install the jax-rs-2.0.war, which is inside-
Oracle_home/wlserver/common/deployable-libraries
If you are working on jsr311 then deploy jsr311-api-111.war which is available on same path.


For Tomcat Deployment Step 3 , 6,7,8 not required

Right click on the Project and Run AS - server- select appropriate server and deploy the same.

if you want to test in browser use-
http://localhost:8080/jersyRestService/rest/helloRest
http://localhost:8080/jersyRestService/rest/helloRest/getDetail/helloRequest


Step 9: Create rest client class which get the test results for rest webservice
package com.siva.restservice.test;

import javax.ws.rs.core.MediaType;

import com.sun.jersey.api.client.Client;
import com.sun.jersey.api.client.WebResource;
/**
 * 
 * @author Siva
 *
 */
public class RestServiceClient {
	
	public static void main(String[] args) {
		String uri = "http://localhost:8080/jersyRestService/rest/helloRest";
		try{
			
			Client client = Client.create();
			WebResource resource = client.resource(uri);
			String response = resource.type(MediaType.TEXT_PLAIN).get(String.class);
			System.out.println("Response from Rest webservice["+response+"]");
			String request = "GetRestWithParam";
			uri = uri.concat("/getDetail/").concat(request);
			resource = client.resource(uri);
			String response1 = resource.type(MediaType.TEXT_PLAIN).get(String.class);
			System.out.println("Response from Rest webservice with parameter["+response1+"]");
		}
		catch(Exception ex){
			ex.printStackTrace();
		}
	}

}


Step 10: You can see the output as below

Response from Rest webservice[Hello Welcome to Rest webservice]
Response from Rest webservice with parameter[Hello Welcome to Rest webservice you have given input as -GetRestWithParam]


Thank you very much for viewing this post. If you like, don't forget to share/comment.


AddToAny

Contact Form

Name

Email *

Message *