Saturday, September 24, 2016

How to do customized Sorting byHashMap key or by value using Comparator - Java


This post will explain how to sort by key and sort by value using HashMap and Comparator.

Step 1: First create a Employee class which is having all the details related to Employee

/**
 * 
 * @author rajusiva
 *
 */

public class Employee {

	
	Integer empId;
	String name;
	Float salary;
	
	public Employee(Integer id,String name, Float sal){
		this.empId = id;
		this.name = name;
		this.salary = sal;
		
	}
	
	@Override
	public String toString() {
		return "Emp Id: "+this.empId+" Name: "+this.name +" salary: " +this.salary;
	}

	public Integer getEmpId() {
		return empId;
	}
	public void setEmpId(Integer empId) {
		this.empId = empId;
	}
	public String getName() {
		return name;
	}
	public void setName(String name) {
		this.name = name;
	}
	public Float getSalary() {
		return salary;
	}
	public void setSalary(Float salary) {
		this.salary = salary;
	}

}


Step 2: Below is the class for sort by key and sort by value using comparator
import java.util.Collections;
import java.util.Comparator;
import java.util.HashMap;
import java.util.Iterator;
import java.util.LinkedHashMap;
import java.util.List;
import java.util.Map;
import java.util.TreeMap;

/** This class is used to custom sort using Comparator interface and overriding compare method.
 * 
 * @author rajusiva
 *
 */
public class CustomHashMapSort {
	
	public static void main(String[] args) {
		Map map = new HashMap();
		map.put("205", new Employee(1, "siva", 75000f));
		map.put("202", new Employee(2, "raju", 85000f));
		map.put("203", new Employee(3, "kumar", 50000f));
		map.put("204", new Employee(4, "arjun", 35000f));
		map.put("200", new Employee(5, "neha", 45000f));
		map.put("198", new Employee(6, "sneha", 25000f));
		
		Map sortedMap = new TreeMap(map);
		for (Iterator iterator = sortedMap.keySet().iterator(); iterator.hasNext();) {
			String key = (String) iterator.next();
			Employee emp = map.get(key);
			System.out.println("Sort By key [" + key  +"]  [" + emp + "]");
			
		}
		System.out.println("=============================================");
		HashMap sortedMapByValue = sortByValue(map);
		for (Iterator iterator = sortedMapByValue.keySet().iterator(); iterator.hasNext();) {
			String key = (String) iterator.next();
			Employee emp = map.get(key);
			System.out.println("Sort By Value by Name  Key-[ "+key  +"]  value [" + emp.getName() +"]");
			
		}
		
		
	}
	/**This method will used to sort custom object value type(either empId,name, salary)
	 * 
	 * @param empLoyeeMap of type Map values
	 * @return sorted hashmap values
	 */
	public static  HashMap sortByValue(Map empLoyeeMap) {
		List> list = new java.util.LinkedList>(empLoyeeMap.entrySet());

		Collections.sort(list, new Comparator>() {
        // sort the value using compare method and comparator
		 @Override
		 public int compare(Map.Entry value1, Map.Entry value2) {
		 return (value1.getValue().getName()).compareTo(value2.getValue().getName());
		 }
		});
		
		 HashMap sortedHashMap = new LinkedHashMap();
	       for (Iterator it = list.iterator(); it.hasNext();) {
	              Map.Entry entry = (Map.Entry) it.next();
	              sortedHashMap.put(entry.getKey(), entry.getValue());
	       } 
	       return sortedHashMap;
		
		
	}
	

}


output:

Sort By key [198]  [Emp Id: 6 Name: sneha salary: 25000.0]
Sort By key [200]  [Emp Id: 5 Name: neha salary: 45000.0]
Sort By key [202]  [Emp Id: 2 Name: raju salary: 85000.0]
Sort By key [203]  [Emp Id: 3 Name: kumar salary: 50000.0]
Sort By key [204]  [Emp Id: 4 Name: arjun salary: 35000.0]
Sort By key [205]  [Emp Id: 1 Name: siva salary: 75000.0]
=============================================
Sort By Value by Name  Key-[ 204]  value [arjun]
Sort By Value by Name  Key-[ 203]  value [kumar]
Sort By Value by Name  Key-[ 200]  value [neha]
Sort By Value by Name  Key-[ 202]  value [raju]
Sort By Value by Name  Key-[ 205]  value [siva]
Sort By Value by Name  Key-[ 198]  value [sneha]


Hope this will help you to understand how we can custom object sort by key and value using comparator.

Tuesday, August 9, 2016

Validate IP address using Java regex


Step 1. Write a java class with name ValidateIPAddress
Step 2. Write a regex pattern. Learn more about reg expression https://docs.oracle.com/javase/tutorial/essential/regex/
public class ValidateIPAddress {
 
 private static final String PATTERN =
   "^([01]?\\d\\d?|2[0-4]\\d|25[0-5])\\." +
   "([01]?\\d\\d?|2[0-4]\\d|25[0-5])\\." +
   "([01]?\\d\\d?|2[0-4]\\d|25[0-5])\\." +
   "([01]?\\d\\d?|2[0-4]\\d|25[0-5])$";
 public static void main(String []args)
    {
     //Pass input value has hard coded value or as a input parameter
            String IP = "000.12.12.034";
            System.out.println(IP.matches(PATTERN));
        

    }
}
Step 3. Description about regex

1. ^                   #line start
2. (                #  start of group 
3. [01]?\\d\\d?        # It can be one or two digits. If three digits appear, it must start either 0 or 1
4. |             # or
5. 2[0-4]\\d        # start with 2, follow by 0-4 and end with any digit (2[0-4][0-9])
6. |                   # or
7. 25[0-5]             # start with 2, follow by 5 and ends with 0-5 (25[0-5])
8. )             #  end of group #2
9. \.                  #  follow by a dot "."
10. ....               # repeat with 3 times (3x)
11. $             #end of the line
 
Step 4. Input 1. Hello.IP 2. 000.12.12.034
Step 5. Output 1. false 2.true

Thank you very much for viewing this post

Monday, July 18, 2016

Getting started with Apache Kafka on windows environment. Run kafka, zoookeeper on windows environment


This post will explain you about how to work with apache kafka on windows environment along with zookeeper and java.

Pre requesties
1. Download Java latest version and install the same.
Setup the path variables where our java is installed.
2.Download zookeeper latest version and install the same.
Setup the path variables where our zookeeper is installed.
3.Download apache kafka latest version( kafka_2.10-0.10.0.0.tgz) and install the same.

Zookeeper setup

1. Go to confdir, where we have installed our zookeeper.
2. Rename zoo_sample.cfg to zoo.cfg
3. Open zoo.cfg file
4. find dataDir=/tmp/zookeeper to C:\zookeeper-3.3.6\data

5. Setup path for zookeeper in Environment variables


6. Open the Environment variables- click the system variables C:\spark\zookeeper-3.3.6\bin
7. If we want we can change the default port no 2181 in zoo.cfg file
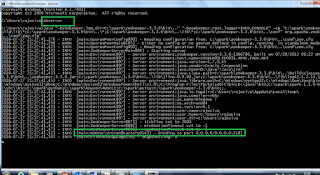
8. Run the Zookeeper from cmd prompt. execute zkserver command
9. We can see the below image after successful zookeeper started


Kafka setup and run kafka

1. Untar the same and go to kafka config directory
2. Look for server.properties and edit the same
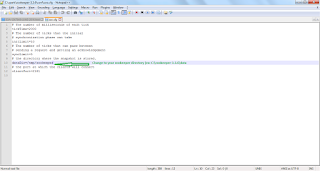
3. Find the log.dirs=/tmp/kafka-logs to log.dirs= “C:\spark\kafka_2.10-0.10.0.0\kafka-logs”
4. Now go to kafka installation directory – copy the installation path
5. Open the command prompt and go to kafka installation directory-
C:\spark\kafka_2.10-0.10.0.0
6. Execute the below command from the command prompt
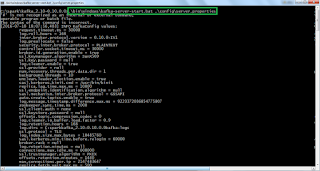
.\bin\windows\kafka-server-start.bat .\config\server.properties


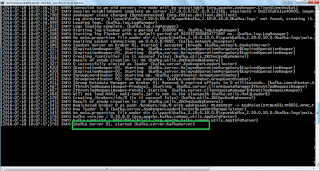
7. Once everything fine then kafka server will start and display image as mentioned below


How to Create topics

1. Open command prompt and go to C:\spark\kafka_2.10-0.10.0.0\bin\windows
2. Copy the below command and hit enter
kafka-topics.bat --create --zookeeper localhost:2181 --replication-factor 1 --partitions 1 --topic kafkatest
         

How to create producer
1. Open command prompt and go to C:\spark\kafka_2.10-0.10.0.0\bin\windows
2. Copy the below command and hit enter
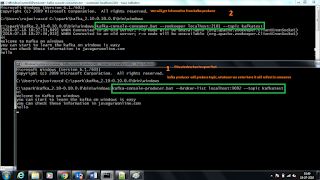
kafka-console-producer.bat –broker-list localhost:9092 --topic kafkatest 

How to create consumer
1. Open command prompt and go to C:\spark\kafka_2.10-0.10.0.0\bin\windows
2. Copy the below command and hit enter
kafka-console-consumer.bat --zookeeper localhost:2181 --topic kafkatest
        

Once Producer and consumer started then, we can start to post messages from producer and reflect in consumer.
How to replicate data from producer to consumer
1. Try to enter some data in producer window, the same data will be replicates in consumer window.


More useful commands


1. Listing all topics which we have created
-
kafka-topics.bat --list --zookeeper localhost:2181
2. describe about particular topic
-
kafka-topics.bat --list --zookeeper localhost:2181 
3. Read all messages from particular topic
-
kafka-console-consumer.bat --zookeeper localhost:2181 --topic kafkatest --from-beginning 


Thank you very much for viewing this post.

Sunday, July 17, 2016

Spark Closures, Broadcasting , Optimizing and Partitioning


This post will explain you about how to do Optimization in Spark and how to work with closures, Broadcasting and partitioning.

1. Closures
- It is standalone function, which contains at least one bound variable
var count = 0
   var list =  1 to 20
   list.foreach(x => {
    count +=1
    println(s"count is currently $count")
    })
   println(s"Final count is $count") 


How to use Closures in our Spark?
1. Since Spark distributed so variable reference is could not cross node boundary’s.
So each partition will get it’s own copy of variables.
var count = 0
   val rdd = sc.makeRDD(1 to 20 , 10)
   rdd.foreach(x => {
     count +=1
println(s"count is currently $count")
})
println(s"Final count is $count") 


2. This happens in outside Driver . So final count will not be updated.
3. For this we will us built in methods
2. Broadcasting

val indexer =Map(…) //1MB - it will be distributed across clusters for each execution
rdd.flatMap(rddVal => indexer.get(rddVal))
a. Usually Map will distribute Simple 1MB data into multiple workers and store size will be 10 to 11 MB data
b. To avoid this we have broadcast variables into place
val indexer = sc.brodcast(Map(…)) //Map 1MB ; indexer<1MB rdd.flatMap(rddVal = >indexer.value.get(rddVal))
3. Optimizing Partitioning
a. Make RDD with lot of data with 10000 chunks
b. Then use the filter to drastically reduces the data set
c. Then we will do the some more transformations before calling the final collect.
sc.makeRDD(1 to Int.MaxValue,10000).filter(x=>x < 10).sortBy(x=>x).map(x=>x+1).collect
          sc.makeRDD(1 to Int.MaxValue,10000).filter(x=>x < 10).coalesce(8,true).sortBy(x=>x).map(x=>x+1).collect
       
We can check the jobs data using http://localhost:4040

How normal partition will work as how partition will work with coalesce


This is how spark advanced concepts will work.
Thank you very much for viewing this post.

AddToAny

Contact Form

Name

Email *

Message *