Friday, April 29, 2016

Print numbers 1 to 100 , Replace 'A' which number is divisible by 3 and Replace 'B' which number is divisible by 5 and Replace 'AB' which number is divisible by 3 and 5

This post will explain you about how to print numbers from 1 to 100 with following conditions.
1. Replace 'A' which number is divisible by 3
2. Replace 'B' which number is divisible by 5
3. Replace 'AB' which number is divisible by 3 and 5

import java.util.ArrayList;
import java.util.List;


public class TestPrintNumbers {
 
 public static void main(String[] args) {
  List list = new ArrayList();
  String finalResult = new String();
  for(Integer i=1;i<=100;i++){
       if(i%3==0 && i%5==0 ){
          list.add("AB");
       }
       else if(i%3==0){
   list.add("A");
       }
       else if(i%5==0){
          list.add("B");
       }
              else if(i%3 !=0 && i%5!=0){
          list.add(i);
                }
  }
     for (int j = 0; j < list.size(); j++) {
      finalResult = finalResult.concat(list.get(j)+",");
  }
  System.out.print(finalResult.substring(0,finalResult.length()-1));
  
 }

}

Output
1,2,A,4,B,A,7,8,A,B,11,A,13,14,AB,16,17,A,19,B,A,22,23,A,B,26,A,28,29,AB,31,32,A,34,B,A,37,38,A,B,41,A,43,44,AB,46,47,A,49,B,A,52,53,A,B,56,A,58,59,AB,61,62,A,64,B,A,67,68,A,B,71,A,73,74,AB,76,77,A,79,B,A,82,83,A,B,86,A,88,89,AB,91,92,A,94,B,A,97,98,A,B

Sunday, March 27, 2016

Getting started with apache flume, retrieve Twitter tweets data into HDFS using flume


This post will explain you about, flume installation , retrieve tweets to HDFS, Twitter app creation for development.

1.Download latest flume
2.Untar the downloaded tar file in which ever location you want.
sudo tar -xvzf apache-flume-1.6.0-bin.tar.gz
3.Once you have done the above steps, u can start the ssh localhost, if not connected to ssh server
4.Start the dfs ./start-dfs.sh
5.Start the ./start-yarn.sh
6.Go up to bin folder where flume has been extracted
7.Here I am extracted flume under /usr/local/flume-ng/apache-flume-1.6.0-bin
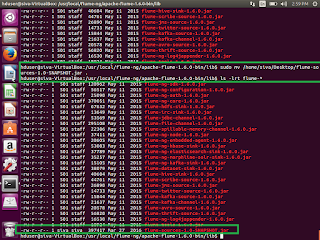
8.First Download the flume-sources-1.0-snapshot.jar and move that jar into inside /usr/local/flume-ng/apache-flume-1.6.0-bin/lib/

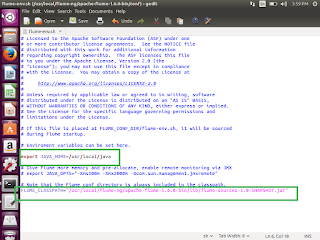
9.Once we have done this, Now we need to set the java path and snapshot.jar path details in flume-env.sh
/usr/local/flume-ng/apache-flume-1.6.0-bin/conf>sudo cp flume-env.sh.template flume-env.sh
   /usr/local/flume-ng/apache-flume-1.6.0-bin/conf> sudo gedit flume-env.sh

10.Now we need to register our application with twitter dev
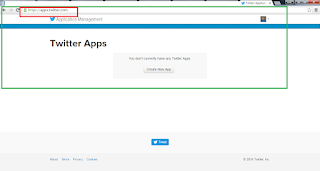
11.open the twitter , if you are not having sign in details, then please signup the same. Once you have signed up then use the twitter apps

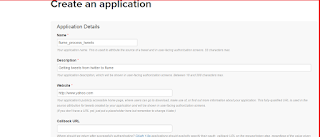
12. Click on Create New App Enter the required details

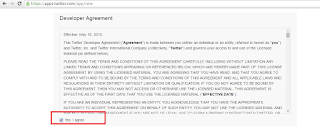
13. Check the I Agree checkbox

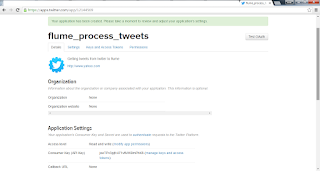
14.Once application has been created then twitter page will be look like this.


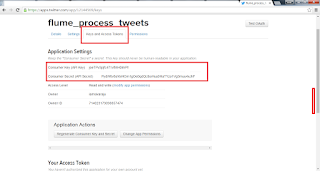
15.Click on the Keys and Access Tokens tab and copy consumer key and consumer secret key and paste any notepad

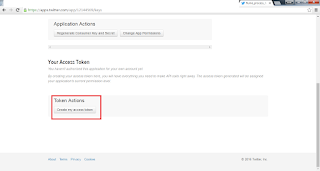
16.Click Create my access token

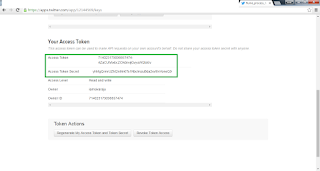
17.It will generate access token and access token secret, copy these 2 values and place it notepad

18.Create flume.conf file under /usr/local/flume-ng/apache-flume-1.6.0-bin/conf and paste the below details.
# Licensed to the Apache Software Foundation (ASF) under one
# or more contributor license agreements.  See the NOTICE file
# distributed with this work for additional information
# regarding copyright ownership.  The ASF licenses this file
# to you under the Apache License, Version 2.0 (the
# "License"); you may not use this file except in compliance
# with the License.  You may obtain a copy of the License at
#
#  http://www.apache.org/licenses/LICENSE-2.0
#
# Unless required by applicable law or agreed to in writing,
# software distributed under the License is distributed on an
# "AS IS" BASIS, WITHOUT WARRANTIES OR CONDITIONS OF ANY
# KIND, either express or implied.  See the License for the
# specific language governing permissions and limitations
# under the License.


# The configuration file needs to define the sources, 
# the channels and the sinks.
# Sources, channels and sinks are defined per agent, 
# in this case called 'TwitterAgent'

TwitterAgent.sources = Twitter
TwitterAgent.channels = MemChannel
TwitterAgent.sinks = HDFS

TwitterAgent.sources.Twitter.type = com.cloudera.flume.source.TwitterSource
TwitterAgent.sources.Twitter.channels = MemChannel
TwitterAgent.sources.Twitter.consumerKey = joeTPv3pjfc471vfMH0lmP
TwitterAgent.sources.Twitter.consumerSecret = PydW6v8aYoiHOm1gOe0qdQUboHua9HaTYzo1Vg3muu4xJhF
TwitterAgent.sources.Twitter.accessToken = 714023179098857474-4ZaCUhAxbcZCKdnvijGvyuWQteEv
TwitterAgent.sources.Twitter.accessTokenSecret = yhMgQrmrUZht2nMn6Ts1NbclmzuBda2xvtIIvVoneQ 
TwitterAgent.sources.Twitter.keywords = hadoop, big data, analytics, bigdata, cloudera, data science, data scientiest, business intelligence, mapreduce, data warehouse, data warehousing, mahout, hbase, nosql, newsql, businessintelligence, cloudcomputing

TwitterAgent.sinks.HDFS.channel = MemChannel
TwitterAgent.sinks.HDFS.type = hdfs
TwitterAgent.sinks.HDFS.hdfs.path = hdfs://localhost:9000/user/flume/tweets/%Y/%m/%d/%H/
TwitterAgent.sinks.HDFS.hdfs.fileType = DataStream
TwitterAgent.sinks.HDFS.hdfs.writeFormat = Text
TwitterAgent.sinks.HDFS.hdfs.batchSize = 1000
TwitterAgent.sinks.HDFS.hdfs.rollSize = 0
TwitterAgent.sinks.HDFS.hdfs.rollCount = 10000

TwitterAgent.channels.MemChannel.type = memory
TwitterAgent.channels.MemChannel.capacity = 10000
TwitterAgent.channels.MemChannel.transactionCapacity = 100

19. Once that is done , then we need to run the twitter agent in flume.
/usr/local/flume-ng/apache-flume-1.6.0-bin>./bin/flume-ng agent -n TwitterAgent -c conf -f /usr/local/apache-flume-1.6.0-bin/conf/flume.conf

20. once it is started , wait for some time and click the ctrl+C and now it's time to see the tweets in HDFS file.
21. Open the browser which is there in unix machine and browse the same. go to /user/flume/tweets and see the tweets
http://localhost:50075
22. we can see data similar as shown in twitter, then the unstructured data has been streamed from twitter on to HDFS successfully. Now we can do analytics on this twitter data using Hive.

This is how we can bring live tweets data into HDFS and we can do the analytics using hive.
Thank you very much for viewing this post


Zookeeper Basics, HBase Zookeeper


This post will explain you basics about Zookeeper.
Why Zookeeper
Zookeeper is coordinating mechanism for HBase.

It is mainly used in cluster environment.
Target market for Zookeeper


Zookeeper Data Model
1. Hierarchal namespace (like File System)
2. Each Z node as data and children
3. Data is read and write in its entity

Zookeeper will provide services like, if any one server failure , then another server will be accessible, without any delay.
Zookeeper will provide
1. Wait free
2. Simple , Robust, Good Performance
3. Turned for Read Dominant Workloads
4. Familiar Models and interfaces
5. Need to be able to wait efficiency
Zookeeper and Hbase
Master failover
Region servers and master discovery via zookeeper
1. HBase clients connect zookeeper to find configuration details
2. Region server and master failure detection.
How HBase and Zookeeper will work?


Master
If more than one master, then they fight
Root Region Server
1. This Z node holds the location of the server hosting the root of all the tables in HBase.
2. A directory in which there is a znode per HBase region server
3. Region servers register themselves with zookeeper when they come online.
On region server failure (detected via ephemeral znodes and notification via zookeeper), the
master splits the edits out per region.

These are the basic details about zookeeper.
Thank you very much for viewing this post.


Saturday, March 26, 2016

Getting started with HBase, HBase Compactions, Load data into HBase Using Sqoop

This post will explain you abou HBase Compactions, how to install HBase and start the Hbase, HBase Basic operations.
How to load data into HBase using sqoop.
HBase Compactions

1. HBase writes out immutable files as data is added
a). Each store consists rowkey-ordered files.
b).Immutable- more files accumulated over time.
2. Compaction rewrite several files into one
a).Lesser files – Faster reads
3. Major compaction rewrites all files in a store into one
a).Can drop deleted records and older versions
4. In a minor compaction, files to compact are selected based on a heuristic.

How to install HBase and start the same.
1. First download latest version HBase from http://www.apache.org/dyn/closer.cgi/hbase/ or https://hbase.apache.org/
2. Once Downloaded, then try to un tar the same.
3. tar –xvzf hbase-1.0.1.1-hadoop1-bin.tar.gz
4. Go to /usr/local/hbase/hbase-1.0.1.1/
5. ./bin/start-hbase.sh
6. Once it is started , then
7. ./bin/hbase shell
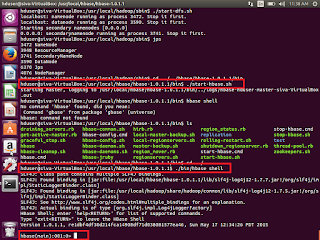


We can see the shell window to work with. Try to enter list. It will show you list of existing tables.
If we are able to execute this command means our hbase started successfully without any issue.
Hbase>list

Now we will see sql operations through HBase.
HBase Basic operations
Create a table syntax
Create ‘table_name’ , ‘column_family’
HBase>Create ‘htest’,’cf’
Insert data
put ‘table_name’ ,’row_key1’,’column_family:columnname’,’v1’
Update data

put ‘table_name’ ,’row_key1’,’column_family:columnname’,’v2’
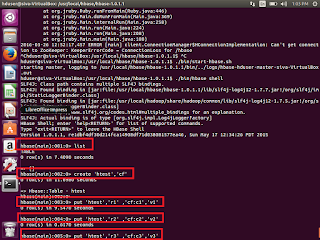

Select few rows
get  ‘table_name’ ,’row_key1’
Select whole table
scan ‘table_name’
Delete particular row value
delete  ‘table_name’ ,’row_key1’,’column_family:columnname’
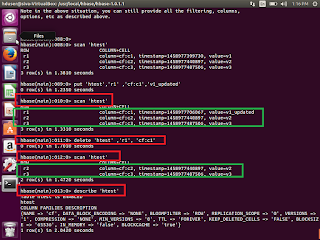


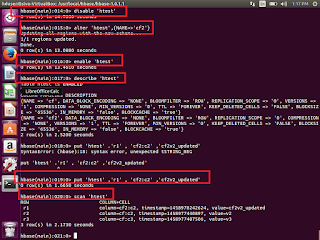
Alter existing table
Before alter the table, first we need to disable the same table
disable ''
alter '' ,{NAME=''}

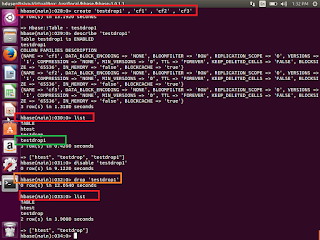
Drop the table
First disable the existing table, which we supposed to be drop
Hbase>Disable  ‘testdrop1’
Hbase>drop  ‘testdrop1’

How to create table from java and insert the data to the same in HBase table ?
First open eclipse-> create a new project ->class->HBaseTest.java
Copy and paste the below code. If any compilation errors then add the respective Hbase jars the same

Public class HBaseTest {
  Public static vaoid main(String args[]) throws  IO Exception{
 //We need Configuration object to tell the client where to connect.
//when we create a HBaseConfiguration , it reads whatever we have set into our hbase-site.xml, and //hbase-default.xml, as long as these can be found in the classpath
    Configuration config = HBaseConfiguration.create();
 //Instantiate HTable  object, that connects the testHBaseTable
//Create a table with name  testHBaseTable,  if it is not available.
   HTable table = new HTable(config,” testHBaseTable”);
//To Add a row use Put, Put constructor takes the name of the row which we want to insert into a //byte array, in HBase , the Bytes class has utility to converting all kinds of java types to byte arrays.
Put p = new Put(“testRow”);

//to set the value to row , we would like to update in the row testRow .
//Specify the column family. Column qualifier and value of the table.
//cell we would like to update then the column family must already exist.
//in our table schema the qualifier can be anything
//All must be specified as byte arrays as hbase is all about byte arrays.
p.add(Bytes.toBytes(“littleFamily”),Bytes.toBytes(“littleQualifier”),Bytes.toBytes(“little Value”));
//Once we have updated all the values for Put instance. Then HTable#put method takes Put instance  //we have building and pushes the change we made into HBase.
table.put(p);
//Now, to retrieve the data which we have just wrote the table;
Get   g = new Get(Bytes.toBytes(“testRow”)
Result   r = table.get(g);
byte [] value = r.getValue(Bytes.toBytes(“littleFamily”),Bytes.toBytes(“littleQualifier”));
String ValueString = Bytes.toString(value);
System.out.println(“GET:”+valueString);
//Some times we don’t know about row name, then we can use the scan to retrieve all the data from //the table
Scan s = new Scan();
s.addColumn(Bytes.toBytes(“littleFamily”), Bytes.toBytes(“littleQualifier”));
ResultScanner scanner = table.getScanner(s);
try{
   for (Result rr = scanner.next();rr!=null;rr=scanner.next()){
    System.out.println(“Found Row record:”+ rr);
  } 
}
finally{
scanner.close();
}
 }
 }


Different ways to load the data into HBase
1. HBase Shell
2. Using Client API
3. Using PIG
4. Using SQOOP

How to load data into HBase using SQOOP?
Sqoop can be used directly import data from RDBMS to HBase.
First we need to install sqoop.
1. Download sqoop http://www.apache.org/dyn/closer.lua/sqoop/1.4.6
2. Untar the Sqoop
tar -xvzf sqoop-1.4.6.bin__hadoop-0.23.tar.gz  
3. Go upto bin. then run the executing below command.
sqoop import
               --connector jdbc:mysql://\
                --username  --password 
                --table
                --hbase-table 
                --column-family 
                --hbase-row-key 
                --hbase-create-table

This is how we will work with HBase.
Thank you very much for viewing this post.
AddToAny

Contact Form

Name

Email *

Message *