Thursday, February 25, 2016

Clickjacking prevention using X Frame Options and J2EE Filter


1. What is Clickjacking.
It is also known as User Interface redress attack, UI redress attack, UI redressing
It is a malicious technique of tricking a Web user into clicking on something different from what the user perceives they are clicking on, thus potentially revealing confidential information or taking control of their computer while clicking on seemingly innocuous web pages. It is a browser security issue that is a vulnerability across a variety of browsers and platforms
2. How to prevent Clickjacking using Filter in java
Below example shows how Clickjacking will happens and how we can prevent the same.

Here I have created a Simple LoginServlet , after successful login, page will be redirected to success page.
Everyone knows how to create servlet and deploy the same. But still I am writing here to understand who have no idea how to create.
Step 1: Start eclipse
Step2: create a Dynamic Web Project -> clickjacking_prevention
Step3: first we need to create a login.jsp page, under Webcontent of the project
<%@ page language="java" contentType="text/html; charset=ISO-8859-1"
    pageEncoding="ISO-8859-1"%>


Login page


User Name
Password
Step 4: Need to create a success page
<%@ page language="java" contentType="text/html; charset=ISO-8859-1"
    pageEncoding="ISO-8859-1"%>


Login Success


Login Successful
You can construct page as you like

Step 5: Now we need to create a LoginServlet
package com.siva;

import java.io.IOException;

import javax.servlet.ServletException;
import javax.servlet.http.HttpServlet;
import javax.servlet.http.HttpServletRequest;
import javax.servlet.http.HttpServletResponse;

public class LoginServlet extends HttpServlet{

 /**
  * 
  */
 private static final long serialVersionUID = 1L;

 public void doPost(HttpServletRequest request, HttpServletResponse response)
   throws ServletException, IOException {

  String username = request.getParameter("username");
  String password = request.getParameter("password");
  if("siva".equalsIgnoreCase(username)&& "raju".equalsIgnoreCase(password)){
   System.out.println("inside if condition");
   response.sendRedirect("loginSuccess.jsp");
  }
 }
}
Step 6: Now we need to do Configuration in web.xml for LoginServlet


  clickjacking_prevention
  
    login.jsp


    LoginServlet
    com.siva.LoginServlet
  
  
   LoginServlet
   /loginServlet
  

Step 7: Once this configuration done, Now we can run the project using any of the servers like Apache tomcat or Jboss.
You can use the http://localhost:8080/clickjacking_prevention/
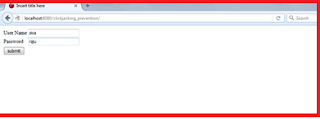


It will open page like above and you can enter username as siva and password as raju, then submit,
You can redirected to loginSuccess page


Create a html file and provide name as you like and paste the below code.


  click jaking


Once we run this html file we can see the same data which is showed in the loginSuccess page


Step 10 : Now we can see the difference between above two images. One is url page and one is iframe constructed page, both are same.
So hacker can use this , and patch in your actual site and steal the data.
Now How to prevent this.
We need to add this code in our filter or jsp page.
response.addHeader("X-FRAME-OPTIONS", “DENY” );
Here I have written Filter to overcome clickjacking
package com.siva;

import java.io.IOException;

import javax.servlet.Filter;
import javax.servlet.FilterChain;
import javax.servlet.FilterConfig;
import javax.servlet.ServletException;
import javax.servlet.ServletRequest;
import javax.servlet.ServletResponse;
import javax.servlet.http.HttpServletResponse;


public class ClickjackingPreventionFilter implements Filter 
{
  private String mode = "DENY";
  
// Add X-FRAME-OPTIONS response header to tell any other browsers who   not to display this //content in a frame.
     public void doFilter(ServletRequest request, ServletResponse response, FilterChain chain) throws IOException, ServletException {
         HttpServletResponse res = (HttpServletResponse)response;
         res.addHeader("X-FRAME-OPTIONS", mode );   
         chain.doFilter(request, response);
     }
     public void destroy() {
     }
     
     public void init(FilterConfig filterConfig) {
         String configMode = filterConfig.getInitParameter("mode");
         if ( configMode != null ) {
             mode = configMode;
         }
     }
}


Step 11: Once Filter has completed now we need to add same filter configuration in web.xml file

        ClickjackPreventionFilterDeny
        com.siva.ClickjackingPreventionFilter
        
            modeDENY


        ClickjackPreventionFilterDeny
        /*
    

Once we have done configuration , you can run the same Iframe example again, you can see the below page without any content, it will show warning in IE and it will not show any details in other browser.


This is how we can prevent the clickjacking attacks.
Thank you for viewing the post.


Sunday, February 14, 2016

Getting started Hadoop with oracle or vmware virtual box and Ubuntu


Hadoop installation with Single DataNode( VMware or Oracle virtual box)
Download latest version VM ware from the below link
http://www.traffictool.net/vmware/
Download Oracle virtual box from the below site and install the same in local system.
http://www.oracle.com/technetwork/server-storage/virtualbox/downloads/index.html
Run the Virtual box(VirtualBox.exe) Application
click on new ->

And click on Next->Next-And create virtual box
Once that’s done virtual box will look like this. Select the Ubuntu downloaded package.


Start the Virtual box, then provide password from which user you want to start.

Once virtual box started then screeb will look like this


Open the terminal, by right click on the screen or search for terminal and open the same.


Command:to update the ubuntu
1. sudo apt-get update
Once update is complete

Command: install openssh server
2. sudo apt-get install openssh–server
Command: create a hadoop directory
3. mkdir /usr/local/hadoop
Download the hadoop latest version from below link
http://hadoop.apache.org/releases.html
copy to virtual box and extract the tar file
Here I extracted under /usr/local/hadoop/
Command: to extract the tar file
4. tar -xvf .tar.gz
After extracting enter this command ls –lrt , you can see the list of folders related to hadoop
Command: To add hadoop to the group
5. sudo addgroup hadoop
Command: create new user called hduser
6. sudo adduser --ingroup hadoop hduser

Command: assign hduser to sudo
7. sudo adduser hduser sudo
Command: change the owner for hadoop as hduser
8. sudo chown –R hduser:hadoop /usr/local/hadoop
Command: switch to hduser
9. su – hduser

Command: install ssh
10. sudo apt-get install ssh
Command: generate a ssh key
11. ssh-keygen -t rsa –P ""
/home/hduser/.ssh/id_rsa
Command: copy id_rsa.pub key to authorized_keys
12. cat ~/.ssh/id_rsa.pub >> ~/.ssh/authorized_keys
Command: install vim editor
13. sudo apt-get install vim
Command: Edit the sysctl.conf file to dispable few of the ipv6 realted configuration
14. sudo gedit /etc/sysctl.conf or sudo vi /etc/sysctl.conf
Add below lines
net.ipv6.conf.all.disable_ipv6=1
                   net.ipv6.conf.default_ipv6=1
                  net.ipv6.conf.io.disable_ipv6=1
              

Command:Start the ssh
15. ssh localhost
Command: get the updates
16. sudo apt-get update
Command: edit the bashrc file to add the path of java and hadoop
17. sudo vi ./bashrc or sudo gedit ./bashrc

export  HADOOP_HOME = /usr/local/hadoop
         export  JAVA_HOME=/usr   [or] where ever your java installed location
Command: Source the bashrc file
18. source .bashrc

Command: Now check the version of java and hadoop
19. java –version
20. hadoop version
Command:Create a data directory inside /usr/local/hadoop
21. mkdir /usr/loca/hadoop/data
Command: edit the hadoop_env.sh file to add the configuration
22. sudo gedit /usr/loca/hadoop/etc/hadoop/hadoop_env.sh
export JAVA_HOME=/usr 
        export HADOOP_OPTS=”$HADOOP_OPTS –Djava.net.preferIPv4Stack= true  -Djava.library.path=$HADOOP_PREFIX/lib”
Command: edit the yarn_env.sh file to add the configuration
23. sudo gedit /usr/loca/hadoop/etc/hadoop/yarn_env.sh
export HADOOP_CONF_LIB_NATIVE_DIR=${HADOOP_PREFIX:-“lib/native”}
        export HADOOP_OPTS=” Djava.library.path=$HADOOP_PREFIX/lib”
Now we need to edit the some of the hadoop related files, to start the single node
Go to /usr/local/hadoop/etc/hadoop$
Command: Edit the existing file and add the below configuration
24. sudo gedit core-site.xml

fs.default.name
hdfs://localhost:9000


hadoop.tmp.dir
/usr/local/hadoop/data

Command: Rename mapred-site.xml.template to mapred-site.xml
Go to /usr/local/hadoop/etc/hadoop
25. mv mapred-site.xml.template mapred-site.xml
26. sudo gedit mapred-site.xml

    
       mapreduce.framework.name
       yarn


Then close this file
Edit the hdfs-site.xml,
Command: to edit the hdfs-site.xml
27. sudo gedit hdfs-site.xml

dfs.replication
3

Command:Edit the yarn.xml
28. sudo gedit yarn.xml

   
       yarn.nodemanager.aux-services 
       mapreduce_shuffle
  
 
        yarn.nodemanager.aux-services.mapreduce_shuffle.class
       org.apache.hadoop.mapred.ShuffleHandler


       yarn.resourcemanager.resource-tracker.address
       localhost:8025


        yarn.resourcemanager.scheduler.address
       localhost:8030


        yarn.resourcemanager.address
       localhost:8050


Command: Need to format the namenode
29. /usr/local/hadoop/bin/hadoop namenode –format
After this format done then we need to start the dfs and yarn
30. /usr/local/hadoop/sbin/start-dfs.sh
31. /usr/local/hadoop/sbin/start-yan.sh
Command: to display all the running datanodes and namemodes
32. jps


This is how we can setup the hadoop using oracle/vmware virtual box.

Thank you for viewing this post.


Saturday, February 6, 2016

Getting started with web2py using pythonanywhere web hosting service (cloud)


This post tells you, how to deploy and execute python code written using web2py framework in
pythonanywhere web hosting service kind of cloud for python.
First write any sample code using web2py framework. Sample codes you can check my previous posts like getting started with web2py , blog app using web2py

Once you have completed the simple project, then we need to deploy the same using the cloud.
Web2py can be deployed any web hosting services, now we will look how we can deploy using https://www.pythonanywhere.com/


Click on Signup here! (if you are not sign up yet)


Click on Create a Beginner account and provide the required details, it is enough to post any details in internet.


After successful sign up and Login then, you can redirected to pythonanywhere


Click on DashBoard Then Click on Web


Now we need to create new web app (Click on Add anew web app).


Pythonanywhere will support so many python frameworks, Select the web2py , since we are implementing application using web2py.


Provide the password , which is required to access the application. It will created directory (/home/siva82k/web2py/) with my username.
Click on Next, which will create url for you


Now you can check your application through internet, usually welcome application will be copied to your account.
My case my url will be http://siva82k.pythonanywhere.com, if you try to click on this you can redirected to your application.


Now it’s time to deploy our existing code into pythonanywhere site. First go to our application, where we have written our code, click on pack all as shown in below image.


Then save the code in local system.Once it is completed then go to your pythonanywhere site.
Click on Administrative Interface, and the provide the password, which you have given while creating web2py account.


After successful Login, it will redirected to below page


We need to upload the file into python anywhere site . Provide the details under upload and install packed application
I am providing Application name as sivaweb2py
Upload a package from your local system, Earlier where you have downloaded.
Then click on install, our application got installed on pythonanywhere machine.
Now what ever we did in local host machine same thing available in pythonanywhere internet.
You can check my previous posts related to web2py examples.
Earlier we checked Role based access, same thing we will check in pythonanywhere
Click on https://siva82k.pythonanywhere.com/sivaweb2py/blog/view

It will ask the username and password , in my case I have provided user only (siva82k@gmail.com), have access to post the blog.
https://siva82k.pythonanywhere.com/sivaweb2py/blog/post


If we provide correct user name and password, it will take us to post the blog.


If we provide other details, other than post access then it will say you are not authorized.


One more example which we have worked earlier, basics to add the 2 numbers
https://siva82k.pythonanywhere.com/sivaweb2py/basics/request_args/10/20


We can test whatever we did in our previous examples in local system, same thing available in internet.
This is how we can deploy our web2py code using pythonanywhere.
Thanks for viewing this post


Sunday, January 31, 2016

State design pattern with java


State pattern, which allows objects to behave in different ways depending on internal state. State is used when you need a class to behave differently, such as performing slightly different computations, based on some arguments passed through to the class.

Problem: Vehicle different status details

1. VehicleNotificationStatus – having different status details about vehicle.
package com.siva;

public enum VehicleNotificationStatus {
 
 VEHICLE_ORDERED("Vehicle-Ordered"),
 VEHICLE_ORDER_SUBMITTED_FOR_BODY_BUILD("Vehicle-Order-Submitted-For-Body-Build"),
 VEHICLE_BODY_SHOP_COMPLETED("Vehicle-Body-shop_completed"),
 VEHICLE_DELIVERED("Vehicle-Delivered"),
 INVALID("Invalid");
 
 VehicleNotificationStatus(String _type){
  this.type=_type;
 }
 private String type;
 

 public String getType() {
  return type;
 }
 public void setType(String type) {
  this.type = type;
 }

}

2. VehicleStatus interface to evaluate the different statues.
package com.siva;

  public interface VehicleStatus {
 
 public VehicleNotificationStatus evaluateVehicleStatus(String status);

  }

3. Different statues classes to implement the VehicleStatus interface.

VehicleOrdered is one type of status class is to implement VehicleStatus
package com.siva.status;

import com.siva.VehicleNotificationStatus;
import com.siva.VehicleStatus;

public class VehicleOrdered implements VehicleStatus{

 @Override
 public VehicleNotificationStatus evaluateVehicleStatus(String status) {
  System.out.println("VehicleOrdered state start");
    if(VehicleNotificationStatus.VEHICLE_ORDERED.getType().equalsIgnoreCase(status)){
    return VehicleNotificationStatus.VEHICLE_ORDERED;
  }
  return VehicleNotificationStatus.INVALID;
    
 }
 

}
2. VehicleForBodyBuild is one type of status class is to implement VehicleStatus
package com.siva.status;

import com.siva.VehicleNotificationStatus;
import com.siva.VehicleStatus;

public class VehicleForBodyBuild implements VehicleStatus{

 @Override
 public VehicleNotificationStatus evaluateVehicleStatus(String status) {
  System.out.println("VehicleForBodyBuild state start");
    if(VehicleNotificationStatus.VEHICLE_ORDER_SUBMITTED_FOR_BODY_BUILD.getType().equalsIgnoreCase(status)){
    return VehicleNotificationStatus.VEHICLE_ORDER_SUBMITTED_FOR_BODY_BUILD;
  }
  return VehicleNotificationStatus.INVALID;
    
 }

}
3. VehicleDelivered is one type of status class is to implement VehicleStatus
package com.siva.status;

import com.siva.VehicleNotificationStatus;
import com.siva.VehicleStatus;

public class VehicleDelivered  implements VehicleStatus{

 @Override
 public VehicleNotificationStatus evaluateVehicleStatus(String status) {
  System.out.println("VehicleDelivered state start");
    if(VehicleNotificationStatus.VEHICLE_DELIVERED.getType().equalsIgnoreCase(status)){
     System.out.println();
    return VehicleNotificationStatus.VEHICLE_DELIVERED;
  }
  return VehicleNotificationStatus.INVALID;
    
 }
}

4. Now we need to write Factory class which can be implement all this status details.
package com.siva;

import com.siva.status.VehicleDelivered;
import com.siva.status.VehicleForBodyBuild;
import com.siva.status.VehicleOrdered;

public class VehicleStatusFactory {
 
 public static VehicleStatus createStatus(VehicleNotificationStatus status){
  if(status.equals(VehicleNotificationStatus.VEHICLE_ORDERED)){
   return new VehicleOrdered();
  }
  else if(status.equals(VehicleNotificationStatus.VEHICLE_ORDER_SUBMITTED_FOR_BODY_BUILD)){
   return new VehicleForBodyBuild();
  }
  else if(status.equals(VehicleNotificationStatus.VEHICLE_DELIVERED)){
   return new VehicleDelivered();
  }
  else
   return null;
 }

}

5. We have completed the all the classes related to State pattern, now we need to write test class to see the results.
package com.siva;

public class TestStateDesignPattern {
 
 public static void main(String[] args) {
  
  VehicleStatus vehicleStatus =VehicleStatusFactory.createStatus(VehicleNotificationStatus.VEHICLE_ORDERED);
  VehicleNotificationStatus notificationStatus = vehicleStatus.evaluateVehicleStatus(VehicleNotificationStatus.VEHICLE_ORDERED.getType());
  System.out.println(notificationStatus);
  vehicleStatus =VehicleStatusFactory.createStatus(VehicleNotificationStatus.VEHICLE_ORDER_SUBMITTED_FOR_BODY_BUILD);
  VehicleNotificationStatus notificationStatus1 = vehicleStatus.evaluateVehicleStatus(VehicleNotificationStatus.VEHICLE_ORDER_SUBMITTED_FOR_BODY_BUILD.getType());
  System.out.println(notificationStatus1);
  vehicleStatus =VehicleStatusFactory.createStatus(VehicleNotificationStatus.VEHICLE_DELIVERED);
  VehicleNotificationStatus notificationStatus2 = vehicleStatus.evaluateVehicleStatus(VehicleNotificationStatus.VEHICLE_DELIVERED.getType());
  System.out.println(notificationStatus2);
 }

}


Output:
VehicleOrdered state start
VEHICLE_ORDERED
VehicleForBodyBuild state start
VEHICLE_ORDER_SUBMITTED_FOR_BODY_BUILD
VehicleDelivered state start

VEHICLE_DELIVERED


This is how state pattern will work.
Thanks for viewing this post.

AddToAny

Contact Form

Name

Email *

Message *