This post will explain advance topics in Spark.
1. Spark Distribution
2. Spark Cluster Management
3. AWS setup for ec2 and Access and Identity Management
4. How to create cluster using AWS
5.Spark UI
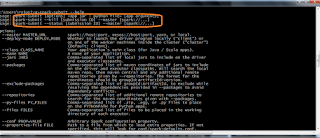
Spark –Submit
We will see how spark –submit will work.
1. When application submitted it launches to the driver and which will run through the application main method.
2. This Driver process could decide submitting machine or distributed cluster on master node, it is depending how it is submitted.
3. Then Driver asks the Cluster manager to specify the amount of resources. As long as resources are available. Cluster was spend them up to use.
4. Then Driver will run through the main application to building up the RDD until it reach action. Which causes the Driver to trigger the execution of the DAG and manage the work flow.
5. Once that completes the driver continues to the main code until the entire execution done. At that point resources are cleaned up. However this resource clean up could occur before the Driver completes. If the Spark context start method called before that.
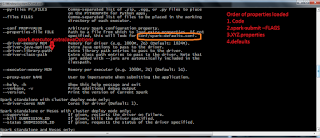
Spark submit for mater through local means single machine
Local[#] – specifies no of CPUs , spark has to work
Local[*] – specifies all CPUs , spark has to work
Deploy mode :
Client – will deploy in same machine
Master –one of the worker machines inside the cluster
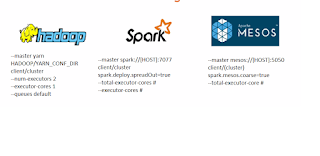
Cluster Managers
1. What is cluster Manager?
- It is distributed tunnel and like a model data center.
- One machine is referred as cluster manager- which is responsible to manage other systems.
2. Primary cluster managers used for spark.
- Spark will have it’s own built in manager called spark standalone.
[ --master spark://[HOST]:7077
It is work with client/cluster mode
Spark.deploy.spreadOut=true
--total-executor-cores #
--executor-cores
- Hadoop will have manager name called YARN
- Apache MESOS
--master mesos://[HOST]:5050
Client/(cluster)
Spark.mesos.coarse=false
Spark Standalone
1. To configure Spark standalone each machine required compiled version of spark.
2. We need to configure $SPARK_HOME on each machine. So they point to that location.
3. In master machine we need conf/slaves directory and spark_home directory
4. Inside conf directory we will have SLAVE files(SLAVES_ADDRESS_1, SLAVES_ADDRESS_2…….. SLAVES_ADDRESS_N)
5. We will listing the slave address for each machine address separated by new line
6. If it’s not found these slave address files, then it will take from localhost.
./sibn/start-all.sh to start the spark process. It requires password less ssh directory.
How to start the MASTER
How to start the Worker
1. Use the stop-all.sh from the sbin directory
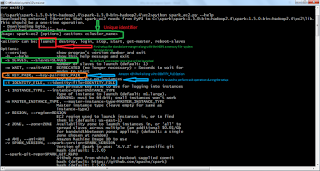
Standalone manager using amazon ec2
1. To start with ec2 we required AWS credentials like AWS_ACCESS_KEY_ID and AWS_SECRET_ACCESS_KEY
How to do AWS setup
1. To work with ec2 cluster environments we need AWS_ACCESS_KEY_ID and AWS_SECRET_ACCESS_KEY. For this we need to be register the same.
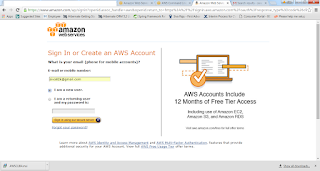
2. First open the https://aws.amazon.com/ in browser.
3. Create AWS account
4. We need to install AWS command line interface (https://aws.amazon.com/cli)
5. After installation we need to set the path for aws in environment variables.( C:\Program Files\Amazon\AWSCLI)
6. In this home we page we will have download link for our respective systems.
7. Here I have downloaded 64 bit windows installer and installed the same.
8. Now go to https://console.aws.amazon.com. If you don’t have account create the same.
9. Please follow the instructions which is displayed in amazon sites to register successfully.
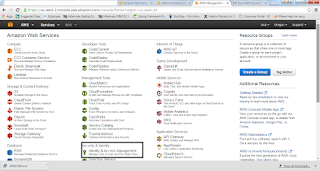
10. Once your registration successful, then login into the aws console. Page should look like this.
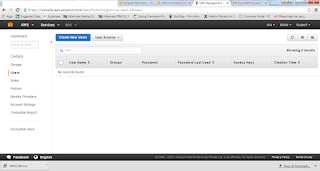
11. Now we will do configuration in Identity and Access Management
12. Then in the Left panel click on the Users and create Create New Users
13. Provide the User Name and check the Generate Access key for each user

14. This key information needed to access AWS functions outside of this web management like ec2 script or CLI.
15. Once we have created then we can show the Credentials, it copy or Download as CSV.
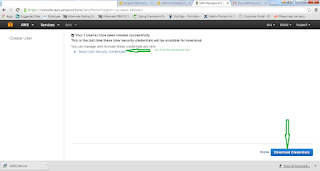
16. It will be available only once, if missed them again we can generate new access keys the same.
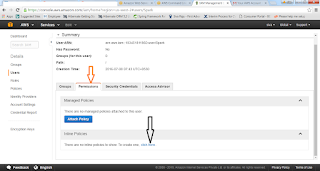
17. Then we need to provide permission to access this cluster
18. Once we have setup the permissions and policies.


How to configure the AWS
Provide all the details like access key id
Secret key id
Default region
Default output format
ssh ability setup
https://console.aws.amazon.com/console
1. First we need to make sure our console is pointing to correct region which we setup at the time of CLI. Because keypair is region specific
2.If we are using non windows file, then we need to change the permissions of the file.chmod 444 [KEY FILE PATH]
3. We are the soul owner of this file.
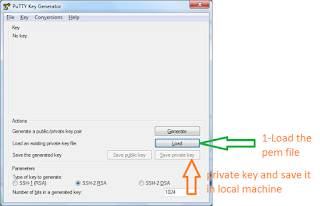
4. Now we are working on windows , we need to convert to the pem file into ppk file using putty gen
5.If you don’t have putty – then go to putty.org download the putty.exe and puttygen.exe
6.Putty is for enabling ssh on windows
7.puttygen to generate ppk files
8.Load the file (.pem file) through putty gen and click on the Generate.
9.If you face any error while creating default-roles then u can download awscli version and install the same.
https://s3.amazonaws.com/aws-cli/AWSCLI64-1.10.30.msi

Spark on Yarn in EMR(ElasticMapReduce)
How to create a cluster in AWS
1. To create a cluster, we need to specify cluster name
2. Release label- which tells the emr which version of the machine setup to use.
3. What type of instance we want to use in our cluster
4. How many instances we want to use in cluster
5. We will specify bootstrap with the spark application.
6. We will specify the use default roles
7. We will specify the key pair name which we have created.
8. Once we have successfully submitted then we will get back the cluster id, which is useful to make CLI calls in future respect to this cluster.
{
"ClusterId": "j-2JKL1Y73KHMZ0"
}
Let us now monitor the cluster in the EMR section of console
https://us-west-2.console.aws.amazon.com/elasticmapreduce/home?region=us-west-2#
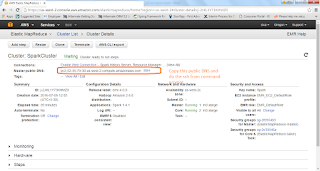
1. once cluster started then we need to copy the master PUBLIC DNS to do the ssh from our environment to cluster.
2. dynamic proxy 8157
3. export SPARK_PUBLIC_DNS=< ec2-52-35-79-30.us-west-2.compute.amazonaws.com>
4. spark-shell run in EMR
Once spark shell executed in EMR, then we can execute all the actions in EMR.
SPARK UI
1. We can monitor and maintain spark applications using tool called Spark UI.
2. We need to configure browser to handle the proxy for ssh connections.
3. Follow the instructions http://amzn.to/1LWax9x
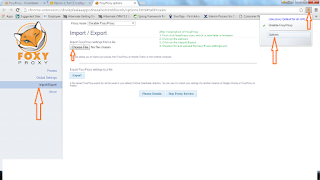
4. First install proxy named FoxyProxy - https://getfoxyproxy.org/downloads/
5. Follow the http://docs.aws.amazon.com/ElasticMapReduce/latest/DeveloperGuide/emr-connect-master-node-proxy.html#emr-connect-foxy-proxy-chrome
6. Copy that content and create a file called foxyProxy-settings.xml
7. Once that is done, if we execute any job or program, the details will be available in the
8. http://ec2-52-35-79-30.us-west-2.compute.amazonaws.com:4040/jobs/
9. Here ip address is our cluster ip address and default port is 4040
10. We can use port 20888, and following the address like
11. http://ec2-52-35-79-30.us-west-2.compute.amazonaws.com:20888/proxy/
12. History of completed applications available under port :18080
13. http://ec2-52-35-79-30.us-west-2.compute.amazonaws.com:18080
1. Spark Distribution
2. Spark Cluster Management
3. AWS setup for ec2 and Access and Identity Management
4. How to create cluster using AWS
5.Spark UI
Spark –Submit
We will see how spark –submit will work.
1. When application submitted it launches to the driver and which will run through the application main method.
2. This Driver process could decide submitting machine or distributed cluster on master node, it is depending how it is submitted.
3. Then Driver asks the Cluster manager to specify the amount of resources. As long as resources are available. Cluster was spend them up to use.
4. Then Driver will run through the main application to building up the RDD until it reach action. Which causes the Driver to trigger the execution of the DAG and manage the work flow.
5. Once that completes the driver continues to the main code until the entire execution done. At that point resources are cleaned up. However this resource clean up could occur before the Driver completes. If the Spark context start method called before that.

Spark submit for mater through local means single machine
Local[#] – specifies no of CPUs , spark has to work
Local[*] – specifies all CPUs , spark has to work
Deploy mode :
Client – will deploy in same machine
Master –one of the worker machines inside the cluster

Cluster Managers
1. What is cluster Manager?
- It is distributed tunnel and like a model data center.
- One machine is referred as cluster manager- which is responsible to manage other systems.
2. Primary cluster managers used for spark.
- Spark will have it’s own built in manager called spark standalone.
[ --master spark://[HOST]:7077
It is work with client/cluster mode
Spark.deploy.spreadOut=true
--total-executor-cores #
--executor-cores
- Hadoop will have manager name called YARN
- Apache MESOS
--master mesos://[HOST]:5050
Client/(cluster)
Spark.mesos.coarse=false

Spark Standalone
1. To configure Spark standalone each machine required compiled version of spark.
2. We need to configure $SPARK_HOME on each machine. So they point to that location.
3. In master machine we need conf/slaves directory and spark_home directory
4. Inside conf directory we will have SLAVE files(SLAVES_ADDRESS_1, SLAVES_ADDRESS_2…….. SLAVES_ADDRESS_N)
5. We will listing the slave address for each machine address separated by new line
6. If it’s not found these slave address files, then it will take from localhost.
./sibn/start-all.sh to start the spark process. It requires password less ssh directory.
How to start the MASTER
>bin/spark-class org.apache.spark.deploy.master.Master
How to start the Worker
  >bin/spark-class org.apache.spark.deploy.worker.Worker
   Spark://[MASTER]:7077
How to stop the running spark process
1. Use the stop-all.sh from the sbin directory
Standalone manager using amazon ec2
1. To start with ec2 we required AWS credentials like AWS_ACCESS_KEY_ID and AWS_SECRET_ACCESS_KEY

How to do AWS setup
1. To work with ec2 cluster environments we need AWS_ACCESS_KEY_ID and AWS_SECRET_ACCESS_KEY. For this we need to be register the same.
2. First open the https://aws.amazon.com/ in browser.
3. Create AWS account

4. We need to install AWS command line interface (https://aws.amazon.com/cli)
5. After installation we need to set the path for aws in environment variables.( C:\Program Files\Amazon\AWSCLI)
6. In this home we page we will have download link for our respective systems.
7. Here I have downloaded 64 bit windows installer and installed the same.
8. Now go to https://console.aws.amazon.com. If you don’t have account create the same.
9. Please follow the instructions which is displayed in amazon sites to register successfully.
10. Once your registration successful, then login into the aws console. Page should look like this.
11. Now we will do configuration in Identity and Access Management

12. Then in the Left panel click on the Users and create Create New Users
13. Provide the User Name and check the Generate Access key for each user


14. This key information needed to access AWS functions outside of this web management like ec2 script or CLI.
15. Once we have created then we can show the Credentials, it copy or Download as CSV.

16. It will be available only once, if missed them again we can generate new access keys the same.
17. Then we need to provide permission to access this cluster
18. Once we have setup the permissions and policies.


How to configure the AWS
C:> aws configure
Provide all the details like access key id
Secret key id
Default region
Default output format
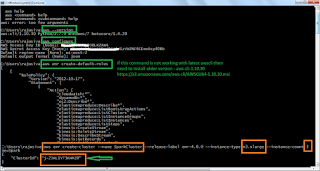
C:>aws emr create-default-roles
ssh ability setup
https://console.aws.amazon.com/console
1. First we need to make sure our console is pointing to correct region which we setup at the time of CLI. Because keypair is region specific
2.If we are using non windows file, then we need to change the permissions of the file.chmod 444 [KEY FILE PATH]
3. We are the soul owner of this file.
4. Now we are working on windows , we need to convert to the pem file into ppk file using putty gen
5.If you don’t have putty – then go to putty.org download the putty.exe and puttygen.exe
6.Putty is for enabling ssh on windows
7.puttygen to generate ppk files
8.Load the file (.pem file) through putty gen and click on the Generate.

9.If you face any error while creating default-roles then u can download awscli version and install the same.
https://s3.amazonaws.com/aws-cli/AWSCLI64-1.10.30.msi

Spark on Yarn in EMR(ElasticMapReduce)
How to create a cluster in AWS
C:>
aws emr create-cluster --name SparkCluster --release-label emr-4.0.0 --instance-type m3.xlarge --instance-count 3 --applications Name=Spark --use-default-roles --ec2-attributes KeyName=Spark
1. To create a cluster, we need to specify cluster name
2. Release label- which tells the emr which version of the machine setup to use.
3. What type of instance we want to use in our cluster
4. How many instances we want to use in cluster
5. We will specify bootstrap with the spark application.
6. We will specify the use default roles
7. We will specify the key pair name which we have created.
8. Once we have successfully submitted then we will get back the cluster id, which is useful to make CLI calls in future respect to this cluster.
{
"ClusterId": "j-2JKL1Y73KHMZ0"
}

Let us now monitor the cluster in the EMR section of console
https://us-west-2.console.aws.amazon.com/elasticmapreduce/home?region=us-west-2#
1. once cluster started then we need to copy the master PUBLIC DNS to do the ssh from our environment to cluster.
putty –ssh –i <.ppk>(which is available in our system) hadoop@1. username hadoop by default-D 8157
2. dynamic proxy 8157
3. export SPARK_PUBLIC_DNS=
4. spark-shell run in EMR
Once spark shell executed in EMR, then we can execute all the actions in EMR.

SPARK UI
1. We can monitor and maintain spark applications using tool called Spark UI.
2. We need to configure browser to handle the proxy for ssh connections.
3. Follow the instructions http://amzn.to/1LWax9x
4. First install proxy named FoxyProxy - https://getfoxyproxy.org/downloads/
5. Follow the http://docs.aws.amazon.com/ElasticMapReduce/latest/DeveloperGuide/emr-connect-master-node-proxy.html#emr-connect-foxy-proxy-chrome
6. Copy that content and create a file called foxyProxy-settings.xml
7. Once that is done, if we execute any job or program, the details will be available in the
8. http://ec2-52-35-79-30.us-west-2.compute.amazonaws.com:4040/jobs/
9. Here ip address is our cluster ip address and default port is 4040
10. We can use port 20888, and following the address like
11. http://ec2-52-35-79-30.us-west-2.compute.amazonaws.com:20888/proxy/
12. History of completed applications available under port :18080
13. http://ec2-52-35-79-30.us-west-2.compute.amazonaws.com:18080


