Monday, March 7, 2016

Getting started with Apache Hive


This post will explain below points.
1. How to install and configure Hive on Ubuntu.
2. How to create a table using HIVE.
3. How to load local data and HDFS external data.
4. Basic SQL commands usage in Hive

Step 1: Download latest hive tar file from the below link
https://hive.apache.org/downloads.html
Command: untar the file using below command
/usr/local> tar –xvzf  /usr/local/ 

Step 2: Once tar has been completed. Then we need to do some configurations to start the HIVE.

Command:to edit the bashrc file
sudo gedit  ~/.bashrc 
Step 3: Add the below configuration detail in bashrc file
       export  HIVE_HOME=”/usr/local/ apache-hive-1.2.1-bin”
       export PATH= $PATH:$HIVE_HOME/bin
      export HADOOP_USER_CLASSPATH_TEST=true
     export PATH
   

Step 4: to avoid [ERROR] Terminal initialization failed; falling back to unsupported java.lang.IncompatibleClassChangeError: Found class jline.Terminal, but interface was expected at jline , below ling of configuration will help.
export HADOOP_USER_CLASSPATH_TEST=true 
Step 5: We need to add configuration in hive-config.sh file.
Command : To add the hadoop home configuration in hive-config.sh
       cd  /usr/local/apache-hive-1.2.1-bin/bin
       sudo gedit hive-config.sh
     
Add the below configuration in hive-config.sh
       export HADOOP_HOME=/usr/local/hadoop
     
Step 6: Once above configurations completed then we need to start the hive

use hive keyword in terminal, then it will open the hive shell for you.


Step 7: This is how we will install and configure HIVE.
Now we are ready to work with HIVE.

Step 8: To know the databases available in hive?
Hive>show databases;
Step 9: To know the tables, which is available in hive?
Hive> show tables;
Step 10: How to create database in Hive?
Hive> create database cricket;
Step 11: How to use created database?
Hive> use cricket;
Step 12: How to create a table inside cricket database
       Hive> create table matchscore(
                                          match_name string,
                                          match_score int,
                                         match_location string
                                      ) row format delimited fields terminated by  ‘,’  ;


Now we have created database successfully. We need to verify whether database created or not.

open another terminal and go up to /user/local>


Step 13: How to Know the database created or not?
$usr/local> hadoop fs –ls /user/hive/warehouse

Step 14: How to Know the database table created or not?

$usr/local> hadoop fs –ls /user/hive/warehouse/cricket.db
Now we have created database and table successfully and verified the same.
We need to insert the data into respective tables.
Now How we will load the data into hive tables.

first create a file in local directory inside /usr/local/hive_demo , If hive_demo dir is not there then create the same.
Step 15: How to create file?
$usr/local/hive_demo> sudo gedit matchinfo.txt

Once we created this file, then we need to load the same into hive table, Go to HIVE shell

Step 16: How to load the data from local system to Hive table

    Hive> LOAD DATA  LOCAL INPATH  ‘/usr/local/hive_demo/matchinfo.txt’  INTO  TABLE matchscore;

Once we have loaded the file, if we want to check ,whether the file has been created inside respective database table or not
Go to terminal /usr/local
Step 17: How to check table data loaded into respective table or not?
$usr/local> hadoop fs –ls /user/hive/warehouse/cricket.db/matchscore

Step 18: How to verify the data has been loaded into Hive table or not
Hive>select * from matchscore;

This is how we will load the local data into Hive tables.
Now we need to check how will load HDFS data into HIVE tables
We can edit the existing file and add the more details to the matchinfo_details.txt file

Step 19: Create HDFS directory
$usr/local> hadoop fs –mkdir -p /usr/local/hive_demo/input

Step 20 :How to put a file in HDFS?

$usr/local>hadoop fs –put /usr/local/hive_demo/ matchinfo_details.txt /usr/local/hive_demo/input/

Now we have created hdfs directory and added the file into HDFS directory.
Step 21: How we will load data into Hive tables?
    Hive> create EXTERNAL table matchscore_result(
                                                      match_name string,
                                                       match_score int,
                                                        match_location string,
                                                       match_result    string)
                              row  format delimited fields terminated by  ‘,’
                               LOCATION ‘/usr/local/hive_demo/input’;


We have successfully loaded the external file data into Hive table.
to check the table data use the select * from matchscore_result from the Hive shell.
Advantage with this external loading is , if we modified the existing file and, again we have kept the updated file into HDFS,
then no need to load the data again into hive, simply we can use select * from matchscore_result. We will get the updated results.

Step 22: How to describe the table structure?
Hive> describe formatted matchscore;

Step 23: How to rename the existing table?
Hive> alter table matchscore rename to matchscore_altered;

Step 24: How to show the updated table list?
Hive> show tables;

This is how we can install and work with Hive basics.
Thank you for viewing this post.

Sunday, February 28, 2016

Apache Hive Basics


Hive Back ground

1. Hive Started at Facebook.
2. Data was collected by cron jobs every night into Oracle DB.
3. ETL via hand-coded python
4. Grew from 10s of GBs(2006) to 1TB/day new data in 2007 , now 10x that

Facebook usecase
1. Facebook uses more than 1000 million users
2. Data is more than 500 TB per day
3. More than 80k queries for day
4. More than 500 million photos per day.

5. Traditional RDBS will not the right solution, to do the above activities.
6. Hadoop Map Reduce is the one to solve this.
7. But Facebook developers having lack of java knowledge to code in Java.
8. They know only SQL well.
So They introduced Hive
Hive
1. Tables can be partitioned and bucketed.
Partitioned and bucketed are used for performance
2. Schema flexibility and evolution
3. Easy to plugin custom mapper reducer code
4. JDBC/ODBC Drivers are available.
5. Hive tables can be directly defined on HDFS
6. Extensible : Types , formats, Functions and scripts.
What do we mean by Hive
1. Data warehousing package built on top of hadoop.
2. Used for Data Analytics
3. Targeted for users comfortable with SQL.
4. It is same as SQL , and it will be called as HiveQL.
5. It is used for managing and querying for structured data.
6. It will hide the complexity of Hadoop
7. No need to learn java and Hadoop API’s
8. Developed by Facebook and contributed to community.
9. Facebook analyse Tera bytes of data using Hive.

Hive Can be defined as below
• Hive Defines SQL like Query language called QL
• Data warehouse infrastructure
• Allows programmers to plugin custom mappers and reducers.
• Provides tools to enable easy to data ETL
Where to use Hive or Hive Applications?
1. Log processing
2. Data Mining
3. Document Indexing
4. Customer facing business intelligence
5. Predective Modeling and hypothesis testing
Why we go for Hive
1. It is SQL like types and if we provide explicit schema and types.
2. By using Hive we can partition the data
3. It has own Thrift sever, we can access data from other places.
4. Hive will support serialization and deserialization
5. DFS access can be accessed implicitly.
6. It supports Joining , Ordering and Sorting
7. It will support own Shell hive script
8. It is having web interface
Hive Architecture


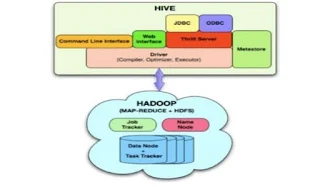
1. Hive data will be stored in Hadoop File System.
2. All Hive meta data like schema name, table structure,view name all the details will be stored in Metastore
3. We will Hive Driver, it will take the request and compile and convert into hadoop understanding language and execute the same.
4. Thrift server is will access hive and fetch data from DFS.

Hive Components


Hive Limitations
1. Not designed for online transaction processing.
2. Does not offer real time queries and row level updates
3. Latency for Hive query’s is high(It will take minutes to process)
4. Provides acceptable latency for interactive data browsing
5. It is not suitable for OLTP type applications.
Hive Query Language Abilities


What is the traditional RDBMS and Hive differences
1. Hive will not verify the data when it is loaded, but it is do at the time of query issued.
2. Schema on read makes very fast initial load. The file operation is just a file copy or move.
3. No updates , Transactions and indexes.
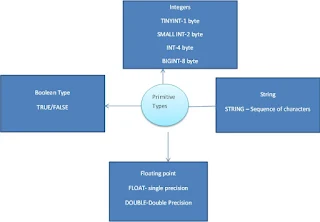
Hive support data types


Hive Complex types:
Complex types can be built up from primitive types and other composite types using the below operators.

Operators
1. Structs: It can be accessed using DOT(.) notation
2. Maps: (Kye-value tuples), it can be accessed using [element-name] as notation
3. Arrays: (Indexable lists) Elements can be accessed using the [n] notation, where n is an index (zero –based) into the array.
Hive Data Models
1. Data Bases
Namespaces – ex: finance and inventory database having Employee table 2 different databases
2. Tables
Schema in namespaces
3. Partitions
How data is stored in HDFS
Grouping databases on some columns
Can have one or more columns
4. Buckets and Clusters
Partitions divided further into buckets on some other column
Use for data sampling

Hive Data in the order of granularity


Buckets
Buckets give extra structure to the data that may be used for more efficient queries
A join of two tables that are bucketed on the same columns – including the join column can be implemented as Map Side Join
Bucketing by user ID means we can quickly evaluate a user based query by running it on a randomized sample of the total set of users.


These are the basics about Hive.

Thank you for viewing the post.

Thursday, February 25, 2016

Clickjacking prevention using X Frame Options and J2EE Filter


1. What is Clickjacking.
It is also known as User Interface redress attack, UI redress attack, UI redressing
It is a malicious technique of tricking a Web user into clicking on something different from what the user perceives they are clicking on, thus potentially revealing confidential information or taking control of their computer while clicking on seemingly innocuous web pages. It is a browser security issue that is a vulnerability across a variety of browsers and platforms
2. How to prevent Clickjacking using Filter in java
Below example shows how Clickjacking will happens and how we can prevent the same.

Here I have created a Simple LoginServlet , after successful login, page will be redirected to success page.
Everyone knows how to create servlet and deploy the same. But still I am writing here to understand who have no idea how to create.
Step 1: Start eclipse
Step2: create a Dynamic Web Project -> clickjacking_prevention
Step3: first we need to create a login.jsp page, under Webcontent of the project
<%@ page language="java" contentType="text/html; charset=ISO-8859-1"
    pageEncoding="ISO-8859-1"%>


Login page


User Name
Password
Step 4: Need to create a success page
<%@ page language="java" contentType="text/html; charset=ISO-8859-1"
    pageEncoding="ISO-8859-1"%>


Login Success


Login Successful
You can construct page as you like

Step 5: Now we need to create a LoginServlet
package com.siva;

import java.io.IOException;

import javax.servlet.ServletException;
import javax.servlet.http.HttpServlet;
import javax.servlet.http.HttpServletRequest;
import javax.servlet.http.HttpServletResponse;

public class LoginServlet extends HttpServlet{

 /**
  * 
  */
 private static final long serialVersionUID = 1L;

 public void doPost(HttpServletRequest request, HttpServletResponse response)
   throws ServletException, IOException {

  String username = request.getParameter("username");
  String password = request.getParameter("password");
  if("siva".equalsIgnoreCase(username)&& "raju".equalsIgnoreCase(password)){
   System.out.println("inside if condition");
   response.sendRedirect("loginSuccess.jsp");
  }
 }
}
Step 6: Now we need to do Configuration in web.xml for LoginServlet


  clickjacking_prevention
  
    login.jsp


    LoginServlet
    com.siva.LoginServlet
  
  
   LoginServlet
   /loginServlet
  

Step 7: Once this configuration done, Now we can run the project using any of the servers like Apache tomcat or Jboss.
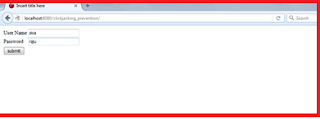
You can use the http://localhost:8080/clickjacking_prevention/


It will open page like above and you can enter username as siva and password as raju, then submit,
You can redirected to loginSuccess page


Create a html file and provide name as you like and paste the below code.


  click jaking


Once we run this html file we can see the same data which is showed in the loginSuccess page


Step 10 : Now we can see the difference between above two images. One is url page and one is iframe constructed page, both are same.
So hacker can use this , and patch in your actual site and steal the data.
Now How to prevent this.
We need to add this code in our filter or jsp page.
response.addHeader("X-FRAME-OPTIONS", “DENY” );
Here I have written Filter to overcome clickjacking
package com.siva;

import java.io.IOException;

import javax.servlet.Filter;
import javax.servlet.FilterChain;
import javax.servlet.FilterConfig;
import javax.servlet.ServletException;
import javax.servlet.ServletRequest;
import javax.servlet.ServletResponse;
import javax.servlet.http.HttpServletResponse;


public class ClickjackingPreventionFilter implements Filter 
{
  private String mode = "DENY";
  
// Add X-FRAME-OPTIONS response header to tell any other browsers who   not to display this //content in a frame.
     public void doFilter(ServletRequest request, ServletResponse response, FilterChain chain) throws IOException, ServletException {
         HttpServletResponse res = (HttpServletResponse)response;
         res.addHeader("X-FRAME-OPTIONS", mode );   
         chain.doFilter(request, response);
     }
     public void destroy() {
     }
     
     public void init(FilterConfig filterConfig) {
         String configMode = filterConfig.getInitParameter("mode");
         if ( configMode != null ) {
             mode = configMode;
         }
     }
}


Step 11: Once Filter has completed now we need to add same filter configuration in web.xml file

        ClickjackPreventionFilterDeny
        com.siva.ClickjackingPreventionFilter
        
            modeDENY


        ClickjackPreventionFilterDeny
        /*
    

Once we have done configuration , you can run the same Iframe example again, you can see the below page without any content, it will show warning in IE and it will not show any details in other browser.


This is how we can prevent the clickjacking attacks.
Thank you for viewing the post.


Sunday, February 14, 2016

Getting started Hadoop with oracle or vmware virtual box and Ubuntu


Hadoop installation with Single DataNode( VMware or Oracle virtual box)
Download latest version VM ware from the below link
http://www.traffictool.net/vmware/
Download Oracle virtual box from the below site and install the same in local system.
http://www.oracle.com/technetwork/server-storage/virtualbox/downloads/index.html
Run the Virtual box(VirtualBox.exe) Application
click on new ->

And click on Next->Next-And create virtual box
Once that’s done virtual box will look like this. Select the Ubuntu downloaded package.


Start the Virtual box, then provide password from which user you want to start.

Once virtual box started then screeb will look like this


Open the terminal, by right click on the screen or search for terminal and open the same.


Command:to update the ubuntu
1. sudo apt-get update
Once update is complete

Command: install openssh server
2. sudo apt-get install openssh–server
Command: create a hadoop directory
3. mkdir /usr/local/hadoop
Download the hadoop latest version from below link
http://hadoop.apache.org/releases.html
copy to virtual box and extract the tar file
Here I extracted under /usr/local/hadoop/
Command: to extract the tar file
4. tar -xvf .tar.gz
After extracting enter this command ls –lrt , you can see the list of folders related to hadoop
Command: To add hadoop to the group
5. sudo addgroup hadoop
Command: create new user called hduser
6. sudo adduser --ingroup hadoop hduser

Command: assign hduser to sudo
7. sudo adduser hduser sudo
Command: change the owner for hadoop as hduser
8. sudo chown –R hduser:hadoop /usr/local/hadoop
Command: switch to hduser
9. su – hduser

Command: install ssh
10. sudo apt-get install ssh
Command: generate a ssh key
11. ssh-keygen -t rsa –P ""
/home/hduser/.ssh/id_rsa
Command: copy id_rsa.pub key to authorized_keys
12. cat ~/.ssh/id_rsa.pub >> ~/.ssh/authorized_keys
Command: install vim editor
13. sudo apt-get install vim
Command: Edit the sysctl.conf file to dispable few of the ipv6 realted configuration
14. sudo gedit /etc/sysctl.conf or sudo vi /etc/sysctl.conf
Add below lines
net.ipv6.conf.all.disable_ipv6=1
                   net.ipv6.conf.default_ipv6=1
                  net.ipv6.conf.io.disable_ipv6=1
              

Command:Start the ssh
15. ssh localhost
Command: get the updates
16. sudo apt-get update
Command: edit the bashrc file to add the path of java and hadoop
17. sudo vi ./bashrc or sudo gedit ./bashrc

export  HADOOP_HOME = /usr/local/hadoop
         export  JAVA_HOME=/usr   [or] where ever your java installed location
Command: Source the bashrc file
18. source .bashrc

Command: Now check the version of java and hadoop
19. java –version
20. hadoop version
Command:Create a data directory inside /usr/local/hadoop
21. mkdir /usr/loca/hadoop/data
Command: edit the hadoop_env.sh file to add the configuration
22. sudo gedit /usr/loca/hadoop/etc/hadoop/hadoop_env.sh
export JAVA_HOME=/usr 
        export HADOOP_OPTS=”$HADOOP_OPTS –Djava.net.preferIPv4Stack= true  -Djava.library.path=$HADOOP_PREFIX/lib”
Command: edit the yarn_env.sh file to add the configuration
23. sudo gedit /usr/loca/hadoop/etc/hadoop/yarn_env.sh
export HADOOP_CONF_LIB_NATIVE_DIR=${HADOOP_PREFIX:-“lib/native”}
        export HADOOP_OPTS=” Djava.library.path=$HADOOP_PREFIX/lib”
Now we need to edit the some of the hadoop related files, to start the single node
Go to /usr/local/hadoop/etc/hadoop$
Command: Edit the existing file and add the below configuration
24. sudo gedit core-site.xml

fs.default.name
hdfs://localhost:9000


hadoop.tmp.dir
/usr/local/hadoop/data

Command: Rename mapred-site.xml.template to mapred-site.xml
Go to /usr/local/hadoop/etc/hadoop
25. mv mapred-site.xml.template mapred-site.xml
26. sudo gedit mapred-site.xml

    
       mapreduce.framework.name
       yarn


Then close this file
Edit the hdfs-site.xml,
Command: to edit the hdfs-site.xml
27. sudo gedit hdfs-site.xml

dfs.replication
3

Command:Edit the yarn.xml
28. sudo gedit yarn.xml

   
       yarn.nodemanager.aux-services 
       mapreduce_shuffle
  
 
        yarn.nodemanager.aux-services.mapreduce_shuffle.class
       org.apache.hadoop.mapred.ShuffleHandler


       yarn.resourcemanager.resource-tracker.address
       localhost:8025


        yarn.resourcemanager.scheduler.address
       localhost:8030


        yarn.resourcemanager.address
       localhost:8050


Command: Need to format the namenode
29. /usr/local/hadoop/bin/hadoop namenode –format
After this format done then we need to start the dfs and yarn
30. /usr/local/hadoop/sbin/start-dfs.sh
31. /usr/local/hadoop/sbin/start-yan.sh
Command: to display all the running datanodes and namemodes
32. jps


This is how we can setup the hadoop using oracle/vmware virtual box.

Thank you for viewing this post.


AddToAny

Contact Form

Name

Email *

Message *