Saturday, February 6, 2016

Getting started with web2py using pythonanywhere web hosting service (cloud)


This post tells you, how to deploy and execute python code written using web2py framework in
pythonanywhere web hosting service kind of cloud for python.
First write any sample code using web2py framework. Sample codes you can check my previous posts like getting started with web2py , blog app using web2py

Once you have completed the simple project, then we need to deploy the same using the cloud.
Web2py can be deployed any web hosting services, now we will look how we can deploy using https://www.pythonanywhere.com/


Click on Signup here! (if you are not sign up yet)


Click on Create a Beginner account and provide the required details, it is enough to post any details in internet.


After successful sign up and Login then, you can redirected to pythonanywhere


Click on DashBoard Then Click on Web


Now we need to create new web app (Click on Add anew web app).


Pythonanywhere will support so many python frameworks, Select the web2py , since we are implementing application using web2py.


Provide the password , which is required to access the application. It will created directory (/home/siva82k/web2py/) with my username.
Click on Next, which will create url for you


Now you can check your application through internet, usually welcome application will be copied to your account.
My case my url will be http://siva82k.pythonanywhere.com, if you try to click on this you can redirected to your application.


Now it’s time to deploy our existing code into pythonanywhere site. First go to our application, where we have written our code, click on pack all as shown in below image.


Then save the code in local system.Once it is completed then go to your pythonanywhere site.
Click on Administrative Interface, and the provide the password, which you have given while creating web2py account.


After successful Login, it will redirected to below page


We need to upload the file into python anywhere site . Provide the details under upload and install packed application
I am providing Application name as sivaweb2py
Upload a package from your local system, Earlier where you have downloaded.
Then click on install, our application got installed on pythonanywhere machine.
Now what ever we did in local host machine same thing available in pythonanywhere internet.
You can check my previous posts related to web2py examples.
Earlier we checked Role based access, same thing we will check in pythonanywhere
Click on https://siva82k.pythonanywhere.com/sivaweb2py/blog/view

It will ask the username and password , in my case I have provided user only (siva82k@gmail.com), have access to post the blog.
https://siva82k.pythonanywhere.com/sivaweb2py/blog/post


If we provide correct user name and password, it will take us to post the blog.


If we provide other details, other than post access then it will say you are not authorized.


One more example which we have worked earlier, basics to add the 2 numbers
https://siva82k.pythonanywhere.com/sivaweb2py/basics/request_args/10/20


We can test whatever we did in our previous examples in local system, same thing available in internet.
This is how we can deploy our web2py code using pythonanywhere.
Thanks for viewing this post


Sunday, January 31, 2016

State design pattern with java


State pattern, which allows objects to behave in different ways depending on internal state. State is used when you need a class to behave differently, such as performing slightly different computations, based on some arguments passed through to the class.

Problem: Vehicle different status details

1. VehicleNotificationStatus – having different status details about vehicle.
package com.siva;

public enum VehicleNotificationStatus {
 
 VEHICLE_ORDERED("Vehicle-Ordered"),
 VEHICLE_ORDER_SUBMITTED_FOR_BODY_BUILD("Vehicle-Order-Submitted-For-Body-Build"),
 VEHICLE_BODY_SHOP_COMPLETED("Vehicle-Body-shop_completed"),
 VEHICLE_DELIVERED("Vehicle-Delivered"),
 INVALID("Invalid");
 
 VehicleNotificationStatus(String _type){
  this.type=_type;
 }
 private String type;
 

 public String getType() {
  return type;
 }
 public void setType(String type) {
  this.type = type;
 }

}

2. VehicleStatus interface to evaluate the different statues.
package com.siva;

  public interface VehicleStatus {
 
 public VehicleNotificationStatus evaluateVehicleStatus(String status);

  }

3. Different statues classes to implement the VehicleStatus interface.

VehicleOrdered is one type of status class is to implement VehicleStatus
package com.siva.status;

import com.siva.VehicleNotificationStatus;
import com.siva.VehicleStatus;

public class VehicleOrdered implements VehicleStatus{

 @Override
 public VehicleNotificationStatus evaluateVehicleStatus(String status) {
  System.out.println("VehicleOrdered state start");
    if(VehicleNotificationStatus.VEHICLE_ORDERED.getType().equalsIgnoreCase(status)){
    return VehicleNotificationStatus.VEHICLE_ORDERED;
  }
  return VehicleNotificationStatus.INVALID;
    
 }
 

}
2. VehicleForBodyBuild is one type of status class is to implement VehicleStatus
package com.siva.status;

import com.siva.VehicleNotificationStatus;
import com.siva.VehicleStatus;

public class VehicleForBodyBuild implements VehicleStatus{

 @Override
 public VehicleNotificationStatus evaluateVehicleStatus(String status) {
  System.out.println("VehicleForBodyBuild state start");
    if(VehicleNotificationStatus.VEHICLE_ORDER_SUBMITTED_FOR_BODY_BUILD.getType().equalsIgnoreCase(status)){
    return VehicleNotificationStatus.VEHICLE_ORDER_SUBMITTED_FOR_BODY_BUILD;
  }
  return VehicleNotificationStatus.INVALID;
    
 }

}
3. VehicleDelivered is one type of status class is to implement VehicleStatus
package com.siva.status;

import com.siva.VehicleNotificationStatus;
import com.siva.VehicleStatus;

public class VehicleDelivered  implements VehicleStatus{

 @Override
 public VehicleNotificationStatus evaluateVehicleStatus(String status) {
  System.out.println("VehicleDelivered state start");
    if(VehicleNotificationStatus.VEHICLE_DELIVERED.getType().equalsIgnoreCase(status)){
     System.out.println();
    return VehicleNotificationStatus.VEHICLE_DELIVERED;
  }
  return VehicleNotificationStatus.INVALID;
    
 }
}

4. Now we need to write Factory class which can be implement all this status details.
package com.siva;

import com.siva.status.VehicleDelivered;
import com.siva.status.VehicleForBodyBuild;
import com.siva.status.VehicleOrdered;

public class VehicleStatusFactory {
 
 public static VehicleStatus createStatus(VehicleNotificationStatus status){
  if(status.equals(VehicleNotificationStatus.VEHICLE_ORDERED)){
   return new VehicleOrdered();
  }
  else if(status.equals(VehicleNotificationStatus.VEHICLE_ORDER_SUBMITTED_FOR_BODY_BUILD)){
   return new VehicleForBodyBuild();
  }
  else if(status.equals(VehicleNotificationStatus.VEHICLE_DELIVERED)){
   return new VehicleDelivered();
  }
  else
   return null;
 }

}

5. We have completed the all the classes related to State pattern, now we need to write test class to see the results.
package com.siva;

public class TestStateDesignPattern {
 
 public static void main(String[] args) {
  
  VehicleStatus vehicleStatus =VehicleStatusFactory.createStatus(VehicleNotificationStatus.VEHICLE_ORDERED);
  VehicleNotificationStatus notificationStatus = vehicleStatus.evaluateVehicleStatus(VehicleNotificationStatus.VEHICLE_ORDERED.getType());
  System.out.println(notificationStatus);
  vehicleStatus =VehicleStatusFactory.createStatus(VehicleNotificationStatus.VEHICLE_ORDER_SUBMITTED_FOR_BODY_BUILD);
  VehicleNotificationStatus notificationStatus1 = vehicleStatus.evaluateVehicleStatus(VehicleNotificationStatus.VEHICLE_ORDER_SUBMITTED_FOR_BODY_BUILD.getType());
  System.out.println(notificationStatus1);
  vehicleStatus =VehicleStatusFactory.createStatus(VehicleNotificationStatus.VEHICLE_DELIVERED);
  VehicleNotificationStatus notificationStatus2 = vehicleStatus.evaluateVehicleStatus(VehicleNotificationStatus.VEHICLE_DELIVERED.getType());
  System.out.println(notificationStatus2);
 }

}


Output:
VehicleOrdered state start
VEHICLE_ORDERED
VehicleForBodyBuild state start
VEHICLE_ORDER_SUBMITTED_FOR_BODY_BUILD
VehicleDelivered state start

VEHICLE_DELIVERED


This is how state pattern will work.
Thanks for viewing this post.

Saturday, January 30, 2016

Role Based Access control using web2py framework


This post having how to provide Role based access to particular users. More information about web2py framework You can check my previous posts.
Getting started with web2py and blog app using web2py
Usually
Role Based Access control having

Account Registration
Providing Security
Adding to Groups
Access to Groups

and users can be

Administrator
Standard User
Manager

Now we can see how we will provide these roles using web2py

1. Start the web2py and provide the password an d start the server.

2. Click this link to open the web2py homepage http://127.0.0.1:8000/welcome/default/index


Click on the Admin link and provide the password.
Edit the sivaweb2py application


After edit, the application will be look like this


Click on the database administration tab which is under Models section, you can view the below page related to database table details


Now we are going to create role based access for exiting project, which is available in my previous post(blog app using web2py). Click the below link to open the exiting project results
http://127.0.0.1:8000/sivaweb2py/blog/view


Now we need to signup this blog and screen will look like as below.


After entering the details and click on signup then you will be redirected to view page. With message as Logged In


Now we have created user and logged in successfully, Now we can check in the database administrator for db details.


We can edit this record and we can see the details. Click on the 1 and see the details, password is encrypted.
Now we have to create auth group, allowing that only same group users only can post the topics in blog.
Go to Databaseadministrator under Models Section
Click on the db.auth_group
Click on the New Record and provide the Role as blog_users and description as you like


After submit the record table details look like below


Now we need to create authentication membership Click on db.auth_membership


Click on the New Record and assign the new memebership for this user and select the Group ID as blog_users


Now it’s time to provide access control
Edit the our existing blog.py.
If any user want to post requires authentication and who ever there under blog_users membership only can post the topics in blog.
@auth.requires_membership('blog_users')
Users are if login then only they can able to view the page.
@auth.requires_login()

# -*- coding: utf-8 -*-
# try something like
def index(): return dict(message="hello from blog.py")

@auth.requires_membership('blog_users')
def post():
    form =SQLFORM(db.blog).process()
    return locals()
@auth.requires_login()
def view():
    rows = db(db.blog).select(orderby=~db.blog.id)
    return locals()

def display_form():
   form = SQLFORM(db.blog)
   if form.process().accepted:
       response.flash = 'form accepted'
       redirect(URL('thanks'))
   elif form.errors:
       response.flash = 'form has errors'
   else:
       response.flash = 'please fill out the form'
   return locals()
def update():
    record = db.blog(request.args(0)) or redirect (URL(post))
    form = SQLFORM(db.blog,record)
    if form.process().accepted:
        response.flash = T('Record Updated')
    else:
        response.flash=T('Please complete the form')
    return locals()


After updating the blog.py with requires_membership and requires_login for post and view respectively, then

If we try to http://127.0.0.1:8000/sivaweb2py/blog/view or
http://127.0.0.1:8000/sivaweb2py/blog/post
Then it will redirected us to login page


Once we enter correct details after successful login , then it will redirected to blog post page or view page


Now I am going to create one more user, who does not have any privileges to post.


New user is not part of post_users group, If we try to click the below link
http://127.0.0.1:8000/sivaweb2py/blog/post

So it will redirect us to not authorized page.


This is how access control can be given to users and user groups using web2py.

Thanks for viewing this page....

Tuesday, January 26, 2016

Learn and shine: Getting started with spring mvc controller and je...

Learn and shine: Getting started with spring mvc controller and je...: Getting started with spring mvc and jersey rest service example This topic is about how to work with sping mvc controller using annotations...

Getting started with spring mvc controller and jersey rest service example

Getting started with spring mvc and jersey rest service example
This topic is about how to work with sping mvc controller using annotations and jersey rest service
Create dynamic web project using eclipse. Name it has springweb-mvc


This is spring project, so first we need to configure the details in web.xml for spring
Edit the web.xml file and add the below code
1. Dispatcher Servlet
2. Context LoaderListener
3. SpringServlet for rest webservice


  springweb-mvc
 
           org.springframework.web.context.ContextLoaderListener
       
        
  spring
  
                org.springframework.web.servlet.DispatcherServlet
        
  1


  spring
  /


  jersey-serlvet
  
   com.sun.jersey.spi.spring.container.servlet.SpringServlet
  
  
   com.sun.jersey.config.property.packages   com.siva.rest  


  jersey-serlvet
  /rest/*


1. Now we need to create spring-servlet.xml, hope you will understand why we need to create this file,
Let me explain , in above web.xml we have configured servlet name as spring. So as part of spring DispatcherServlet we need to create xml (servletname-servlet.xml). in this case spring –servlet.xml
2. Need to provide the jersey related configuration
Here I have provided param-value as com.siva.rest , where our rest service related files resides.

Add below code in spring-servlet.xml


In the above xml, component package we have given has com.siva.controlller, where our controller classes resides.
Since we are using annotations no other configurations required.
View configuration - our views will be under WebContent/views
Now we need to create applicationContext.xml, where application will start the executing, here I am not providing any configuration details in this file, simply I am creating file to avoid runtime exceptions .


Now it’s time to create controllers , rest service and views

1. First we will create rest webservice
Create a Calculator.java under package com.siva.rest
   package com.siva.rest;


import javax.xml.bind.annotation.XmlElement;
import javax.xml.bind.annotation.XmlRootElement;

@XmlRootElement(name = "Calculator")
public class Calculator {

 private int number1;
 private int number2;

 // Must have no-argument constructor
 public Calculator() {

 }

 public Calculator(int number1, int number2) {
  this.number1 = number1;
  this.number2 = number2;
 }

 
 @Override
 public String toString() {
  return new StringBuffer(" Number 1 : ").append(this.number1)
    .append("Number 2 : ").append(this.number2).toString();
 }

 public int getNumber1() {
  return number1;
 }
 @XmlElement
 public void setNumber1(int number1) {
  this.number1 = number1;
 }

 public int getNumber2() {
  return number2;
 }

 @XmlElement
 public void setNumber2(int number2) {
  this.number2 = number2;
 }

}


Now we need to write Rest service class JersyRestService under package com.siva.rest

package com.siva.rest;

import javax.ws.rs.Consumes;
import javax.ws.rs.GET;
import javax.ws.rs.POST;
import javax.ws.rs.Path;
import javax.ws.rs.PathParam;
import javax.ws.rs.Produces;
import javax.ws.rs.core.MediaType;
import javax.ws.rs.core.Response;


@Path("/xmlServices")
public class JerseyRestService {
 
 @GET
 @Path("/add/{number1}/{number2}")
 @Produces(MediaType.TEXT_PLAIN)
 public String add( @PathParam("number1") Integer number1,  @PathParam("number2")Integer number2 ) {
        System.out.println("Number 1["+number1+"], Number 2["+number2+"]");
  return number1+number2 +"";
 }
 
 @POST
 @Path("/substract")
 @Produces(MediaType.TEXT_PLAIN)
 public String substract(Calculator cal ) {
        System.out.println("Number 1["+cal.getNumber1()+"], Number 2["+cal.getNumber2()+"]");
  return(cal.getNumber1()- cal.getNumber2() +"");
 }
}


Create a Controller RestServiceController class under package com.siva.controller

package com.siva.controller;

import javax.ws.rs.core.MediaType;

import org.springframework.stereotype.Controller;
import org.springframework.ui.ModelMap;
import org.springframework.web.bind.annotation.ModelAttribute;
import org.springframework.web.bind.annotation.RequestMapping;
import org.springframework.web.bind.annotation.RequestMethod;
import org.springframework.web.servlet.ModelAndView;

import com.siva.rest.Calculator;
import com.sun.jersey.api.client.Client;
import com.sun.jersey.api.client.ClientResponse;
import com.sun.jersey.api.client.WebResource;

@Controller
public class RestServiceController {

 @RequestMapping(value="/addRequestDetails" ,method = RequestMethod.POST)
 public ModelAndView addNumbers(@ModelAttribute("addRequestDetails") Calculator command,
   ModelMap model) {
  System.out.println("addNumbers inside RestServiceController");
  int number1 = command.getNumber1();
  int number2 = command.getNumber2();
  String resultMessage = null;
  try {
   Client client = Client.create();
   WebResource webResource = client.resource("http://localhost:8080/springweb-mvc/rest/xmlServices/add/"+number1+"/"+number2);
   ClientResponse response = webResource.accept(MediaType.TEXT_PLAIN).get(ClientResponse.class);
   resultMessage = response.getEntity(String.class);
   System.out.println("Addition of the 2 numbers result["+resultMessage+"]");
   System.out.println(" resposne status in RestServiceController ["+response.getStatus()+"]");
   
  }  
  catch (Exception e) {
   System.out.println("Exception occurred while calling rest services..."+e);
      e.printStackTrace();
     } 
  return new ModelAndView("restresult").addObject("resultMessage", "Addition of the two values result is["+resultMessage +"]");
 }
 
 @RequestMapping(value="/substractRequestDetails" ,method = RequestMethod.POST)
 public ModelAndView substractNumbers(@ModelAttribute("substractRequestDetails") Calculator command,
   ModelMap model) {
  System.out.println("addNumbers inside RestServiceController");
  int number1 = command.getNumber1();
  int number2 = command.getNumber2();
  Calculator cal = new Calculator(number1, number2);
  String resultMessage = null;
  try {
   Client client = Client.create();
   WebResource webResource = client.resource("http://localhost:8080/springweb-mvc/rest/xmlServices/substract");
   ClientResponse response = webResource.accept(MediaType.TEXT_PLAIN).post(ClientResponse.class,cal);
   resultMessage = response.getEntity(String.class);
   System.out.println("Substraction of the 2 numbers result["+resultMessage+"]");
   System.out.println(" resposne status in RestServiceController ["+response.getStatus()+"]");
   
  }  
  catch (Exception e) {
   System.out.println("Exception occurred while calling rest services..."+e);
      e.printStackTrace();
     } 
  return new ModelAndView("restresult").addObject("resultMessage", "Substraction of the two values result is["+resultMessage +"]");
 }
}


Create addition.jsp page under WebContent/views/

<%@taglib uri="http://www.springframework.org/tags/form" prefix="form"%>
<%@ page language="java" contentType="text/html; charset=ISO-8859-1"
    pageEncoding="ISO-8859-1"%>


Add 2 numbers using rest service


Number1
Number2

Create substraction.jsp page under WebContent/views/

<%@taglib uri="http://www.springframework.org/tags/form" prefix="form"%>
<%@ page language="java" contentType="text/html; charset=ISO-8859-1"
    pageEncoding="ISO-8859-1"%>


substract 2 numbers using rest post service


Number1
Number2


Now after adding/substracting the numbers we need to show the results
Create a restresult.jsp under WebContent/views/
<%@taglib uri="http://www.springframework.org/tags/form" prefix="form"%>
<%@ page language="java" contentType="text/html; charset=ISO-8859-1"
    pageEncoding="ISO-8859-1"%>


Result of the rest service


${resultMessage}

Now we have completed coding now we need to run this project. I have executed this project using tomcat7 server
Required jars to executing this project, please make sure your tomcat or jboss lib having these ja rs

common jars

commons-beanutils-1.8.0.jar
commons-codec-1.3.jar
commons-collections.jar
commons-digester-2.1.jar
commons-logging-1.0.jar
commons-net-1.4.0.jar


Jersey related jars

jersey-client.jar
jersey-core-1.8.jar
jersey-server-1.8.jar
jersey-spring-1.8


spring related jars


spring-aop-4.1.5.RELEASE.jar
spring-beans-4.1.5.RELEASE.jar
spring-context-4.1.5.RELEASE.jar
spring-core-4.1.5.RELEASE.jar
spring-expression-4.1.5.RELEASE.jar
spring-web-4.1.5.RELEASE.jar
spring-webmvc-4.1.5.RELEASE.jar
asm-3.1.jar

After executing project Now it’s time to see the output.
If project deployed successfully then click the below link
http://localhost:8080/springweb-mvc/views/addition.jsp


After entering the values click on Add button


Substract the numbers using following URL
http://localhost:8080/springweb-mvc/views/substraction.jsp


After entering the details ,Result page same like the addition results page.

This is how Rest service with Spring mvc will work.

If you want execute same rest service using main method use the below code.

Create a class JersyClient.java under package com.siva.rest
package com.siva.rest;


import javax.ws.rs.core.MediaType;

import com.sun.jersey.api.client.Client;
import com.sun.jersey.api.client.ClientResponse;
import com.sun.jersey.api.client.WebResource;


public class JerseyClient {
 
 public static void main(String[] args) {
  try {
   Client client = Client.create();
   //Adding 2 numbers using GET
            WebResource webResource = client.resource("http://localhost:8080/springweb-mvc/rest/xmlServices/add/"+40+"/"+50);
   ClientResponse response = webResource.accept(MediaType.TEXT_PLAIN).get(ClientResponse.class);
   String resultMessage = response.getEntity(String.class);
   System.out.println("Addition of the 2 numbers result["+resultMessage+"]");
   System.out.println(" resposne status in RestServiceController ["+response.getStatus()+"]");
   
   
   //Substract 2 numbers using POST
      Calculator cal = new Calculator(20, 10);
   WebResource webResource1 = client.resource("http://localhost:8080/springweb-mvc/rest/xmlServices/substract");
   ClientResponse response1 = webResource1.accept(MediaType.TEXT_PLAIN).post(ClientResponse.class, cal);
   System.out.println("["+response1.getStatus()+"]");
   if (response1.getStatus() != 200) {
    throw new RuntimeException("Failed : HTTP error code : "+ response1.getStatus());
   }
   String output = response1.getEntity(String.class);
   System.out.println("Substraction of 2 numbers  : \n["+output+"]");
  } catch (Exception e) {

   e.printStackTrace();

  }

 }


}


Thanks for viewing this post.


Saturday, January 23, 2016

Create a blog app using Web2py


1. Start web2py
2. Usually blog will have post and view the post details
3. Validations required to validate the post
4. Database design to store title, content, image category , blog posted date etc..
First we need to create model


5. Edit the db.py file
6.End of the file add the below code, to create a table 'blog' along with columns

db.define_table('blog',
                 Field('blog_title'),
                 Field('blog_details'),
                 Filed('blog_image'),
                 Field('blog_url'),
                 Field('blog_category'),
                 Field('blog_date_posted'))


We need to use validators inside model, more validators look inside

http://web2py.com/examples/static/web2py_cheatsheet.pdf

db.define_table('blog',
                 Field('blog_title', requires=IS_NOT_EMPTY()),
                 Field('blog_details', type='text'),
                 Filed('blog_image',requires=IS_URL()),
                 Field('blog_url',requires=IS_URL()),
                 Field('blog_category',requires=IS_IN_SET(['News','Events','Technology','Business'])),
                 Field('blog_date_posted', type='date',requires=IS_DATE()))


7. Need to add validation for table details


8.Now we need to create a controller, to post the blog app
9.Create controller name called blog under controller section
10.Edit blog.py
11. Add two methods one is called post and one is view


def post():
       form =SQLFORM(db.blog).process()
       return locals()
      def view():
      rows = db(db.blog).select(orderby=~db.blog.id)
      return locals()


12.Now we need to create views as blog/post and blog/view
13.Edit the blog/post.py
{{extend 'layout.html'}}
     

post a blog as you like

{{=form}}

http://127.0.0.1:8000/sivaweb2py/blog/post


14.If you submit without entering any values, then it will show the validation errors


Provide the details as required and submit the same. You can see the success message.

Need to know more about SQLFORMS and validators
http://web2py.com/books/default/chapter/29/07/forms-and-validators
Now we need to update the blog

Edit the blog.py and add the below code for update method

def update():
    record = db.blog(request.args(0)) or redirect (URL(post))
    form = SQLFORM(db.blog,record)
    if form.process().accepted:
        response.flash = T('Record Updated')
    else:
        response.flash=T('Please complete the form')
    return locals()


Create update view under views section
{{extend 'layout.html'}}
            

Update the form

{{=form}}

Click on the below link to update the record or provide number after update method which ever record want to update
http://127.0.0.1:8000/sivaweb2py/blog/update/1


Now we need to create the view page

{{extend 'layout.html'}}
      

View the blog


{{ for x in rows:}}
blog image

{{=x.blog_title}}

categrory:{{=x.blog_category}}

blog Details:{{=x.blog_details}}

blog posted:{{=x.blog_date_posted}}

{{ pass }}


After adding the above code in view.py, if we check the result using below url
http://127.0.0.1:8000/sivaweb2py/blog/view


This is how we can create a blog app using web2py.


Sunday, January 10, 2016

Getting started with web2py framework


    Full Stack web development with Python (Web2Py)
    How to download and install web2py
1.  Go  to http://web2py.com/
2.   Down load latest version http://web2py.com/init/default/download
     Unzip the downloaded file
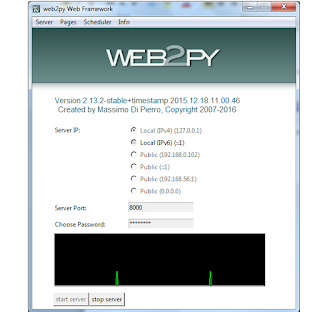
     CliCk on the Web2py.exe file to it will open the window like below


           Provide the password(any password) and start the server
           Server has been started. Now we need to create a application using web2py framework.
           http://localhost:8000


         Click on the Admin,  which is there on the right side in the page. And provide the password which      we have given while starting the server


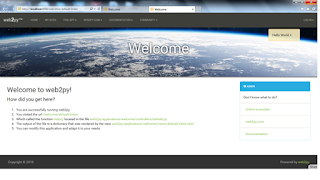
                After Successful Login,  page will be open like below.

               Create a new application using this framework- > New simple application –
       Application Name - ex: sivaweb2py
              Click on the create button. Now we have created application successfully.
               Need to run the application
               http://localhost:8000/sivaweb2py


              Now we need to write sample code in this application. So we need to understand basics of  the
       framework
               Need to edit the application


      This framework will follow MVC architecture
          Model- Contains db details
         Controller – Method and logic details
         Views – Html input/output to the user

Now we need to create one controller and respective views
Click on the Create button under Controller Section
I have given controller name as basics – basics.py will be created under controller

       Now edit the controller – Click on the basics.py
     def helloworld():
     msg= "Hello welcome to basics controller!"
     return locals()


 In the above code helloworld is method name . Copy the code and paste the same in your file.
  Save the file and go to back – by click on the back buton
  Now we need to create a  view- under Views section
  View name should be as method name  ex: basics/helloworld

   {{extend 'layout.html'}}
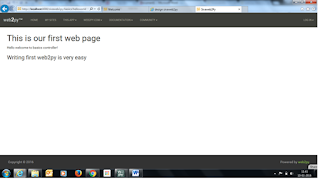
    This is our first web page
   {{ =msg}}

Writing first web2py is very easy


Monday, December 14, 2015

Getting started with Oracle Stored Procedure and parse clob xml data and cursor


This Post will having the details to create stored procedure in oracle and parsing the clob data through stored procedure.
employee.xml
-------------


  siva
  32
  M

Above xml will be stored as clob data in Person table

Person table Schema -

Id NUMBER,
Name Varchar2(50),
employee_details clob

Above xml will be stored as clob data in Person table
create table PERSON (Id NUMBER, Name varchar2(50), employee_details clob);
  create table EMPLOYEE (Name varchar2(50), age NUMBER ,sex varchar2(10));
We need to parse the clob data using oracle procedure

create or replace PROCEDURE SP_PARSE_CLOB (person_id NUMBER) AS
  PERSION_ID Person.id%type;
  PERSON_NAME Person.name%type;
  EMPLOYEE_DETAILS Person.employee_details%type;
  name varchar2(50);
  age varchar2(50);
  sex varchar2(50);
  EMPLOYEE_exc EXCEPTION;
  -- Create a cursor
 cursor personDataCursor IS SELECT id, Name,employee_details from PERSON;
 BEGIN
   OPEN personDataCursor;
 LOOP
 FETCH personDataCursor into PERSION_ID,PERSON_NAME,EMPLOYEE_DETAILS;
 EXIT WHEN personDataCursor%notfound;
 IF XMLTYPE(EMPLOYEE_DETAILS).existSNode('/Employee/name/text()') > 0 THEN
   name := XMLTYPE(EMPLOYEE_DETAILS).extract('/Employee/name/text()').getStringVal();
 END IF;
 IF XMLTYPE(EMPLOYEE_DETAILS).existSNode('/Employee/age/text()') > 0 THEN
  age := XMLTYPE(EMPLOYEE_DETAILS).extract('/Employee/age/text()').getStringVal();
 END IF;
 IF XMLTYPE(EMPLOYEE_DETAILS).existSNode('/Employee/sex/text()') > 0 THEN
  sex := XMLTYPE(EMPLOYEE_DETAILS).extract('/Employee/sex/text()').getStringVal();
 END IF;
 dbms_output.put_line('Name:'|| name|| ' ' || 'Age:' || ' ' ||age || ' ' || 'Sex:' || ' ' || sex);
 -- Inset into another table
BEGIN
  insert into EMPLOYEE(name,age,sex) values(name,age,sex);
 EXCEPTION
    WHEN OTHERS
   THEN
    RAISE EMPLOYEE_exc;
  END;
  commit;
  END LOOP;

EXCEPTION
    WHEN EMPLOYEE_exc
      THEN
        rollback;
     -- Do what ever you want like insert log details in any another table
    commit;
    DBMS_OUTPUT.PUT_LINE ('Insertion failed in EMPLOYEE : '|| '' || name);
    END;

Monday, December 7, 2015

ArithmeticOperations Example using Python

Arithmetic operation using python in windows.
In my previous post , I have written how to install python in windows and add plugin into eclipse.


In this post I am going to explain simple arithmetic operations.

Step 1: Open eclipse - File - New - PyDev Project - arithmeticoperation_test
Step 2: Right click on the - src - New- PyDevModule- ArithmeticOperation
Step 3:Paste below code into ArithmeticOperation.py file.


'''
Created on 07-Dec-2015


@author: rajusiva

'''
a = input("Enter a value:")
b = input("Enter b value:")
print("Addition of 2 values is[",int(a)+int(b),"]")
print("subtract of 2 values is[",int(a)-int(b),"]")
print("Multiply of 2 values is[",int(a)*int(b),"]")
print("Division of 2 values is[",int(a)/int(b),"]")
print("Exponent of 2 values is[",int(a)**int(b),"]")
print("Modules of 2 values is[",int(a)%int(b),"]")
print("Floor Division of 2 values is[",int(a)//int(b),"]")

Step 4: Right click on the program-Run As- Python Run
Step 5: output as follows


Enter a value:25
Enter b value:10
Addition of 2 values is[ 35 ]
subtract of 2 values is[ 15 ]
Multiply of 2 values is[ 250 ]
Division of 2 values is[ 2.5 ]
Exponent of 2 values is[ 95367431640625 ]
Modules of 2 values is[ 5 ]
Floor Division of 2 values is[ 2 ]

AddToAny

Contact Form

Name

Email *

Message *